Home »
Android
Android - Independent view (1) setOnClickListener
Android - Independent view (1) setOnClickListener - In this series, we are going to learn about the click Listeners in Android and how to use them?
Submitted by Manu Jemini, on January 26, 2018
Below is an example of how to use this technique in Independent Buttons. To show that this works, I have created a simple view which has a button and a text view.
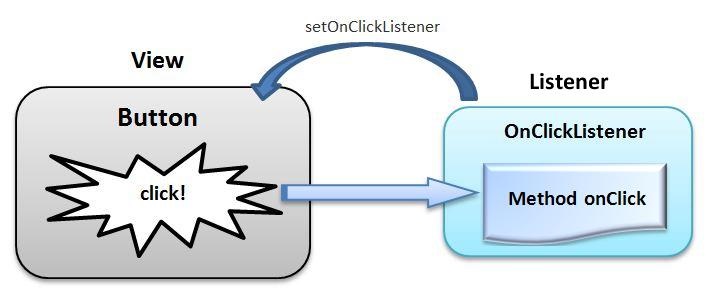
Image source: http://startandroid.ru/images/stories/lessons/L0009/640x261xL0009_040_en.jpg.pagespeed.ic.EA7myifW6R.jpg
Here, if a user presses the button the content of the TextView changes. So how this is works? We have implemented a function which will be called whenever the button gets hits.
.setOnClickListener(new View.OnClickListener() {
	@Override
	public void onClick(View v) {
		text.setText("CHANGED");
	}
});
With the above function, you need to put your code inside onClick block.
Java file:
package com.example.vikramdiwakar.myapplication;
import android.support.v7.app.AppCompatActivity;
import android.os.Bundle;
import android.view.View;
import android.widget.Button;
import android.widget.TextView;

public class MainActivity extends AppCompatActivity {
    Button btn;
    TextView text;
    @Override
    protected void onCreate(Bundle savedInstanceState) {
        super.onCreate(savedInstanceState);
        setContentView(R.layout.activity_main);
        text = (TextView)findViewById(R.id.text);

        btn = (Button)findViewById(R.id.btn);
        btn.setOnClickListener(new View.OnClickListener() {
            @Override
            public void onClick(View v) {
                text.setText("CHANGED");
            }
        });
    }
}
XML file:
<?xml version="1.0" encoding="utf-8"?>
<RelativeLayout xmlns:android="http://schemas.android.com/apk/res/android"
    xmlns:tools="http://schemas.android.com/tools"
    android:layout_width="match_parent"
    android:layout_height="match_parent"
    android:paddingBottom="@dimen/activity_vertical_margin"
    android:paddingLeft="@dimen/activity_horizontal_margin"
    android:paddingRight="@dimen/activity_horizontal_margin"
    android:paddingTop="@dimen/activity_vertical_margin"
    tools:context="com.example.vikramdiwakar.myapplication.MainActivity">

    <LinearLayout
        android:orientation="horizontal"
        android:layout_width="match_parent"
        android:layout_height="match_parent"
        android:layout_alignParentBottom="true"
        android:layout_centerHorizontal="true"
        android:weightSum="1">

        <TextView
            android:layout_width="wrap_content"
            android:layout_height="29dp"
            android:text="This Text Here"
            android:id="@+id/text"
            android:layout_weight="1.07" />

        <Button
            android:layout_width="wrap_content"
            android:layout_height="wrap_content"
            android:text="Button"
            android:id="@+id/btn" />
    </LinearLayout>
</RelativeLayout>
Menifest file:
<?xml version="1.0" encoding="utf-8"?>
<manifest xmlns:android="http://schemas.android.com/apk/res/android"
    package="com.example.vikramdiwakar.myapplication">

    <application
        android:allowBackup="true"
        android:icon="@mipmap/ic_launcher"
        android:label="@string/app_name"
        android:supportsRtl="true"
        android:theme="@style/AppTheme">
        <activity android:name=".MainActivity">
            <intent-filter>
                <action android:name="android.intent.action.MAIN" />

                <category android:name="android.intent.category.LAUNCHER" />
            </intent-filter>
        </activity>
    </application>

</manifest>
Output