Home »
Embedded Systems
Interrupt and Its Use | AVR
In this tutorial, we will learn what an interrupt is, and write an application/sample program to use the interrupt?
By Suryaveer Singh Last updated : May 12, 2023
What are Interrupts in Embedded Systems?
Interrupts are basically events that require intermediate attention by the microcontroller. When an interrupt event occurs the microcontroller pauses its current task and attends to the interrupt by executing an interrupt service. After this, the microcontroller returns to the initial task that it had paused and continues its normal operation.
Example of using interrupts in a program
Now we would create a program in which we would use Interrupt, now we have to write our code such that one bulb keeps blinking with the time interval of 2 sec and we would use another LED bulb such that when the button is pressed the bulb starts to glow and when the button is off stops glowing. The first LED should be keeping on blinking while performing this process.
Code
#include <avr/io.h>
#include <avr/interrupt.h>
#define F_CPU 1000000
#include <util/delay.h>


int main(void)
{
	DDRA =0x03;
	MCUCR = 0x01;
	GICR = 0x40;
	GIFR |= 0x40;
	sei();

	while(1)
	{
		PORTA ^= 1<<PA1;
		_delay_ms(1000);
	}

	return 0;
}

ISR(INT0_vect){
	PORTA ^= 1<<0;
}
Explanation
- Initially, use all the header files that we have used till now.
- DDRA = 0x03 represents the connection of the LED bulb made to the microcontroller.
- MCUCR = 0x01 represents the type of interrupt used.
- GICR = 0x40 represents that the external interrupt is enabled.
- GIFR |= 0x40 is used to make the interrupt initially Zero, by writing this we have cleared the interrupt flag.
- sei() is the global interrupt. It is used to enable the interrupt flag. Similarly, cli() can be used to disable the interrupt flag.
- Inside the while loop, we have done masking so that the next steps used in the programming can also be utilized. If masking not done the code execution will stop here only.
- For PORTA ^= 1<<0, here the X-OR operation is used. Its benefit is that it would perform one time high and one time low.
Simulation
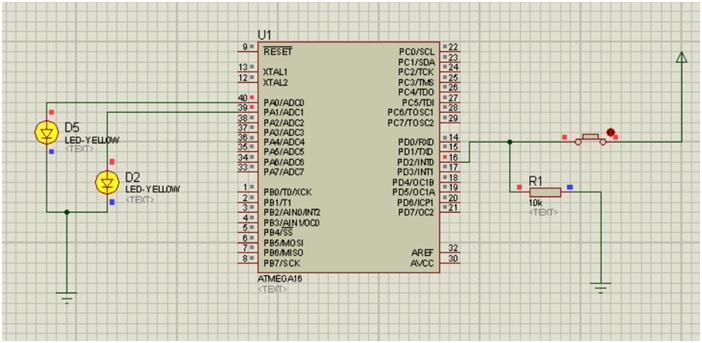
Simulation Explanation
-
Open proteus and add:
- 2 LED Bulbs
- ATmega16
- Resistance
- Button
- 2 Ground Terminals
- Arrange the components as shown in figure.
- Double click on the ATmega16 and upload the Hex file created in it.
- Write the value of the resistor as 10k.
- The above simulation screenshot is at the time when the button is pressed ON and both of our LED bulbs are glowing.