Home »
Python
PyQt- Layout management - 1 (Drag and Drop with QtDesigner)
PyQt- Layout management (Drag and Drop with QtDesigner): In this article, we are going to read about the different kind of layouts available for GUI designing and how to implement them in QT? Since, we are using PyQt; we can either do the drag n drop method by using Qt Designer or coding in python using PyQt module. In this article, we are going to learn through drag n drop way. Few remaining layouts will be covered in the next article. Feel free to ask for doubts in the comment section.
Submitted by Atul Anand, on January 26, 2018
Layouts
It means the tools for the arrangement of visual elements. In other words, it is the master plan or blueprint of your work. There are multiple kinds of layouts provided by Qt designer:
- Adjust size: You can freely adjust elements or widgets in this layout. In most cases it is the by default layout when you first insert a layout in your widget area.
-
Box Layout
- Horizontal layout: Arrange widgets horizontally.
- Vertical Layout: Arrange widgets vertically.
- Horizontal in splitter: Arrange widgets horizontally but split them individually as separate elements.
- Vertical in splitter: Arrange widgets vertically but split them individually as separate elements.
- Form Layout: It makes the visual of the layout exactly same as that of a form.
- Grid Layout: It divides the complete widget area into small grids.
Now, we are going to study details about most of the above layouts and their management in the upcoming section.
Layout Management
In this section, we will discuss about the specifications and management of different layouts. At first, when we load our first ever widget as the current module; there are no layouts present initially. It can be seen in Fig.1 as the red circle marked at the (Object Inspector) tab present at the top right corner. We can notice a "red objection" mark there.
Now, to add a layout we need to right click anywhere in the widget area. And, select the bottommost choice- Layout. Then, we just need to select the desired layout we want to implement.
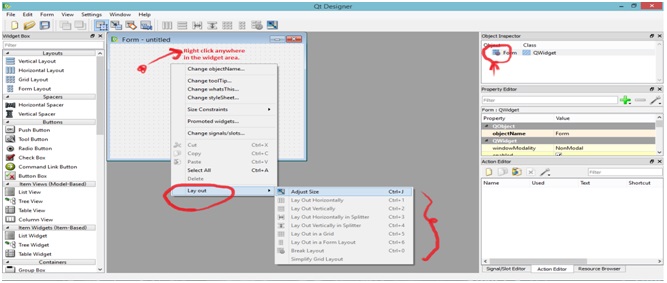 Fig. 1
1. Box Layout
At first, we have selected the horizontal layout. To check for its working; we will add few push buttons in the widget area. We are using only the push button object as the testing object in this whole article. Here, we can observe that the buttons are arranged in a horizontal lane. We can see this in Fig. 2.
Note: The buttons are arranged over the layer of the layout we have used. So, the arrangements will depend upon the layout we have chosen.
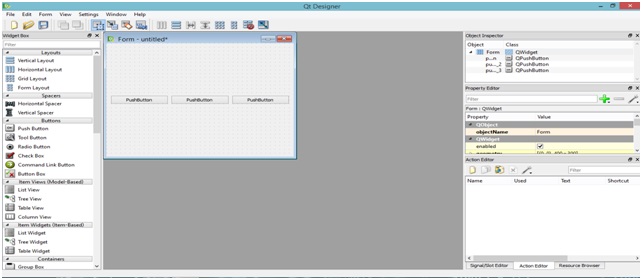 Fig. 2
When we scale the widget, we can observe a self adjustable behavior of the objects (viz. push buttons in this case). But there is no scaling or change in the vertical measurements of the objects. See Fig. 3.
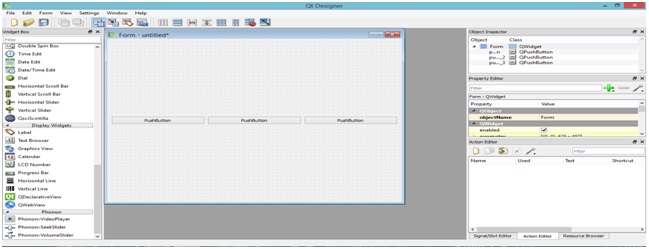 Fig. 3
Thus, each of the objects aligned in a particular line will scale themselves horizontally such that collectively they will cover the whole horizontal space of the widget area.
Conclusion
Thus, so far we have studied the introduction of all the layouts and have covered the horizontal layout in detail. Rest of the layouts will be studied and implemented in the next article. For any kind of doubt, ask in the comment section. See you in the next article. HAPPY LEARNING!