Home »
VueJS Tutorial
List Rendering in VueJS
Learn about the List Rendering in VueJS.
Submitted by Venkatesan C, on March 13, 2022
Rendering a list of items is a very common thing in front-end applications. Rendering a list of products in an e-commerce application, list of users in a social media application, the examples can go on long.
VueJs helps you to render a list of items using a directive called v-for. In this article, let's look at how you can render a list of items using arrays, arrays of objects, arrays of arrays, and objects.
Create a Vue project using the Vite build tool. Let's name it second-app (in fact this is the same project that's been created in the VueJS installation tutorial).
Here's the project structure:
Now delete everything inside the App.vue file and paste the below code. The below is simpler to understand the list rendering in VueJs.
App.vue
<template>
  <h1 v-for="product in products" :key="product">{{ product }}</h1>
  <hr />
  <div v-for="(product, index) in productDetails" :key="index">
    <h4>{{index+1}}. Name: {{ product.name }} | Price: {{ product.price }}</h4>
    <hr />
  </div>
  <div v-for="(product, index) in productCatDetails" :key="index">
    <h3>{{index + 1}}. {{product.category}}</h3>
    <ul>
      <li  v-for="prod in product.products" :key="prod">{{prod}}</li>
    </ul>
  </div>
  <hr>
  <div v-for="(value, key, index) in iphoneSpecs" :key="key">
    <h4>{{index + 1}}. {{key}} - {{value}}</h4>
  </div>
</template>

<script>
export default {
  name: "App",
  data() {
    return {
      products: ["Mac studio", "Ipad air", "Iphone SE", "Iphone 13 pro"],
      productDetails: [
        {
          name: "Mac studio",
          price: "7999$",
        },
        {
          name: "Ipad air",
          price: "699$",
        },
        {
          name: "Iphone SE",
          price: "429$",
        },
        {
          name: "Iphone 13 pro",
          price: "999$",
        },
      ],
      productCatDetails: [
        {
          category: "Iphone",
          products: ["Iphone 10", "Iphone 11", "Iphone 12", "Iphone 13"],
        },
        {
          category: "Ipad",
          products: ["Ipad", "Ipad mini", "Ipad air", "Ipad pro"],
        },
        {
          category: "Mac",
          products: [
            "Imac",
            "Imac pro",
            "Macbook air",
            "Macbook pro",
            "Mac studio",
          ],
        },
      ],
      iphoneSpecs: {
        processor: "A15 bionic",
        camera: "16MP/8MP REAR and 8MP FRONT",
        color: "Midnight black",
        memory: "256 GB",
      },
    };
  },
};
</script>
Let's break down the above code, by considering the HTML element and the corresponding data that's bound to it.
Template:
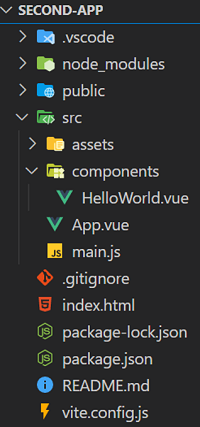
<h1 v-for="product in products" :key="product">{{ product }}</h1>
Data:
products: ["Mac studio", "Ipad air", "Iphone SE", "Iphone 13 pro"],
Here the v-for directive iterates through the products array and outputs the product by text interpolation using mustache syntax.
- product is just a placeholder to print a current item in an iteration. You can name anything you want. However, products is the name of the data.
- :key attribute is used by VueJs for diffing process, where it knows which items changed using the key, and rerender that alone rather than rerender everything again.
- The value to the :key attribute should be unique.
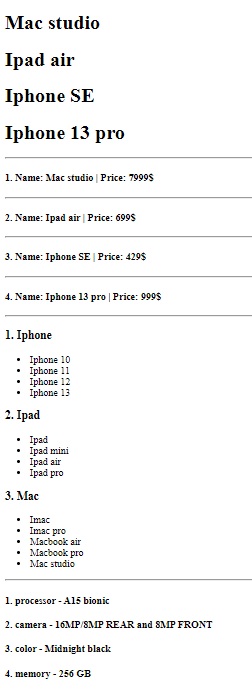
Output:
Template:
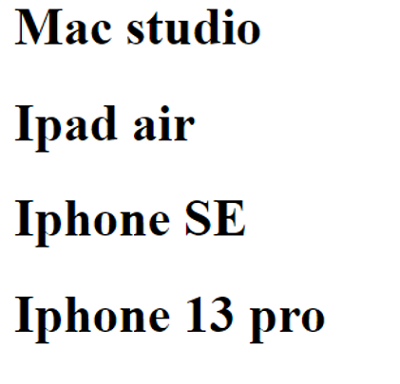
<div v-for="(product, index) in productDetails" :key="index">
    <h4>{{index+1}}. Name: {{ product.name }} | Price: {{ product.price }}</h4>
    <hr />
</div>
Data:
productDetails: [
        {
          name: "Mac studio",
          price: "7999$",
        },
        {
          name: "Ipad air",
          price: "699$",
        },
        {
          name: "Iphone SE",
          price: "429$",
        },
        {
          name: "Iphone 13 pro",
          price: "999$",
        },
      ],
We can also iterate through a list of objects as mentioned above.
In the below line, we can see that we can also output the index of an item.
"(product, index) in productDetails"
Here {{index+1}} is used for numbering the items, since the index starts from 0, it is incremented by 1.
Output:
Template:
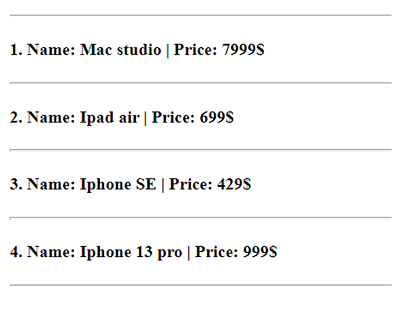
<div v-for="(product, index) in productCatDetails" :key="index">
    <h3>{{index + 1}}. {{product.category}}</h3>
    <ul>
      <li  v-for="prod in product.products" :key="prod">{{prod}}</li>
    </ul>
</div>
Data:
productCatDetails: [
        {
          category: "Iphone",
          products: ["Iphone 10", "Iphone 11", "Iphone 12", "Iphone 13"],
        },
        {
          category: "Ipad",
          products: ["Ipad", "Ipad mini", "Ipad air", "Ipad pro"],
        },
        {
          category: "Mac",
          products: [
            "Imac",
            "Imac pro",
            "Macbook air",
            "Macbook pro",
            "Mac studio",
          ],
        },
      ],
This code is to show that we can iterate through an array which in turn can have an array. You can see that there is another subarray named products in all the objects.
Output:
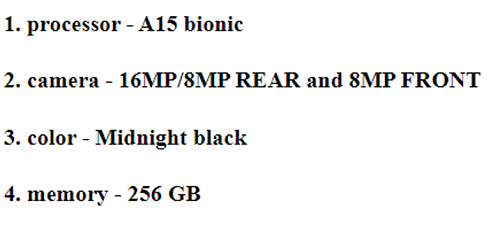
Template:
<div v-for="(value, key, index) in iphoneSpecs" :key="key">
  <h4>{{index + 1}}. {{key}} - {{value}}</h4>
</div>
Data:
iphoneSpecs: {
        processor: "A15 bionic",
        camera: "16MP/8MP REAR and 8MP FRONT",
        color: "Midnight black",
        memory: "256 GB",
      },
The above code shows that we can also iterate through an object. You can also see that we can print the value as well as keys of the object. Indexes can also be printed in the output.
Output:
Complete output:
With this we have reached the end of the tutorial. I hope this tutorial helps you to understand how we can iterate through arrays, arrays of objects, arrays of arrays and objects to render a list of items?