Home »
CSS
How to create Previous and Next buttons with CSS?
In this tutorial, we will learn how to create previous and next buttons with CSS?
By Apurva Mathur Last updated : July 28, 2023
You may have seen on many websites that some content is displayed as pagination, this pagination is sometimes denoted by the number of pages and sometimes we have a next or previous button that toggles the content. These buttons are not complex in design; we can easily create them as we create the normal button.
CSS for Previous and Next buttons
By using the CSS styles (set of CSS properties), we can style the Previous and Next buttons in the CSS. The Anchor (<a>) tag can be used to link Previous and Next articles/tutorials to the current page. The CSS margin and padding properties can be used to provide extra space for the buttons. The CSS color and background-color properties can also be used to add font color and background color of the buttons.
<style type="text/css">.PrevNext {
  font-size: 17px;
}

.PrevNext a,
.PrevNext a:visited {
  background-color: #006969;
  box-shadow: 1px 1px #006969;
  border-radius: 4px;
  color: #fff;
  padding: 8px;
  margin: 16px;
  text-decoration: none;
}

.PrevNext a:hover {
  background-color: #004949;
  box-shadow: 1px 1px #004949;
}

.box {
  background-color: lightblue;
  padding: 32px;
  font-family: verdana;
}

</style>
Example to create Previous and Next buttons with CSS
<!DOCTYPE html>
<html lang="en">
<head>
<meta charset="UTF-8">
<title>Title</title>
</head>
<style type="text/css">
.PrevNext{
font-size: 17px;
}
.PrevNext a, .PrevNext a:visited{
background-color: #006969;
box-shadow: 1px 1px #006969;
border-radius: 4px;
color: #fff;
padding: 8px;
margin: 16px;
text-decoration: none;
}
.PrevNext a:hover{
background-color: #004949;
box-shadow: 1px 1px #004949;
}
.box{
background-color: lightblue;
padding: 32px;
font-family: verdana;
}
</style>
<body>
<center>
<div class="box">
<div class="content">
<h1>Include Helps welcomes you all</h1>
<p>Lorem Ipsum is simply dummy text of the printing and typesetting industry. Lorem Ipsum has been the industry's standard dummy text ever since the 1500s, when an unknown printer took a galley of type and scrambled it to make a type specimen book. It has survived not only five centuries, but also the leap into electronic typesetting, remaining essentially unchanged. It was popularised in the 1960s with the release of Letraset sheets containing Lorem Ipsum passages, and more recently with desktop publishing software like Aldus PageMaker including versions of Lorem Ipsum.</p>
</div>
<div class="PrevNext">
<a href="#">‹ Previous</a>
<a href="#">Next ›</a>
</div>
</div>
</center>
</body>
</html>
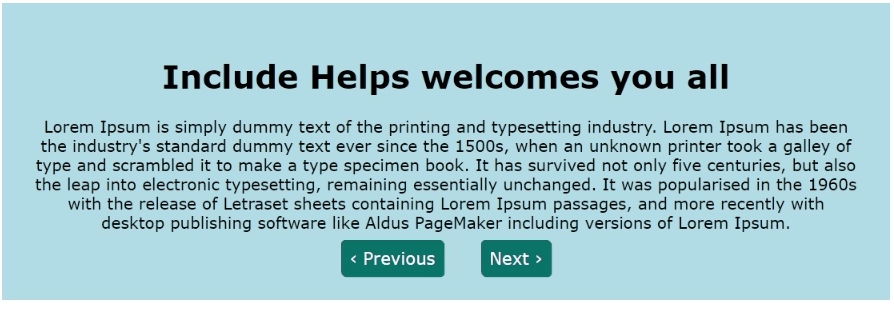
The output of the above example is:
Explanation
Starting with HTML code, the two containers which I've used in the code are just used for some good display, that is not at all important, the important part here starts from the <div> tag, I've written two links (<a> tags) inside the <div> tag, this is because I want these two links on the same line, we can also use display: inline property that is a different approach, here the simplest approach is to specify <div> tag, and inside this tag, specify your <a> tags. Both of the <a> tags contain the links to the previous and next posts.
CSS Examples »