Home »
Node.js
Interacting with forms and web pages using Node.js and Puppeteer – 3
Here, we are going to learn about the another powerful function of the puppeteer API using Node.js – commands for keystroke control and typing as we'll normally do with an opened browser.
Submitted by Godwill Tetah, on May 30, 2019
Hi guys! Today let’s look at another powerful function of the puppeteer API using Node.js part 3.
In the last part of this section, we saw how to fill and submit a form successfully.
Here’s the link to part 1: INTERACTING WITH FORMS AND WEB PAGES USING NODE.JS AND PUPPETEER- 1
Here’s the link to part 2: INTERACTING WITH FORMS AND WEB PAGES USING NODE.JS AND PUPPETEER- 2
Today we’ll look at the last part of this section interacting with forms and web pages.
Let’s see how we can perform the mouse hover function.
Take Note! You should have Node.js and puppeteer installed in your PC.
With Node.js and puppeteer already up and running, let’s get started.
*NB: If you don’t yet have Node.js/ puppeteer installed in your PC, read the article: NODE & GOOGLE PUPPETEER API SERIES
In the last parts, we saw how we can inspect input elements and get their ID/CLASS.
We’ll then make use of the id or class of any element we wish to hover.
Now, let’s get started.
Let’s get the id/class of the element first.
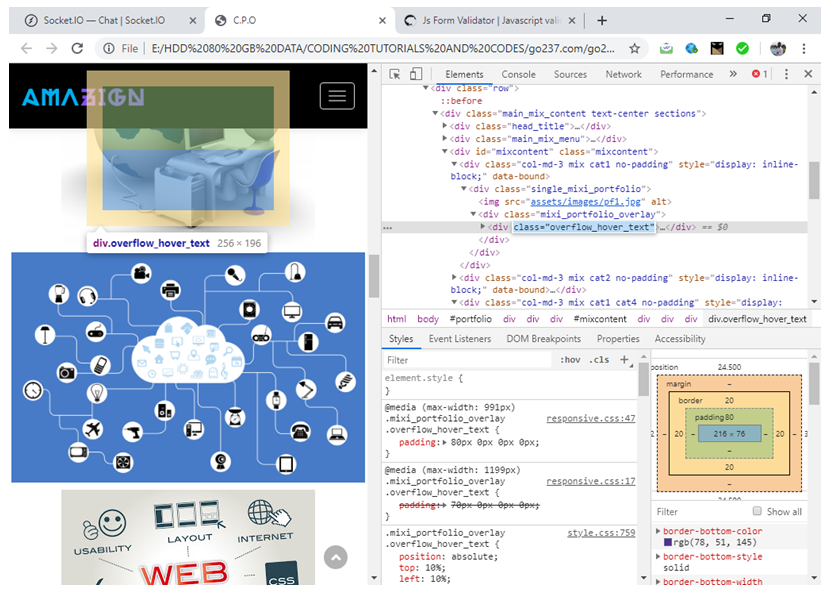
We’ll then use the await.page.hover to hover over the element.
Open a text editor and type the following code and save it with the file name app.js:
const puppeteer = require('puppeteer');
(async () => {
const browser = await puppeteer.launch()
const page = await browser.newPage()
await page.goto('file:///E:/HDD%2080%20GB%20DATA/CODING%20TUTORIALS%20AND%20CODES/go237.com/go237%20web/New%20design/index.html')
await page.hover('.overflow_hover_text') // hover command and class of element as parameter
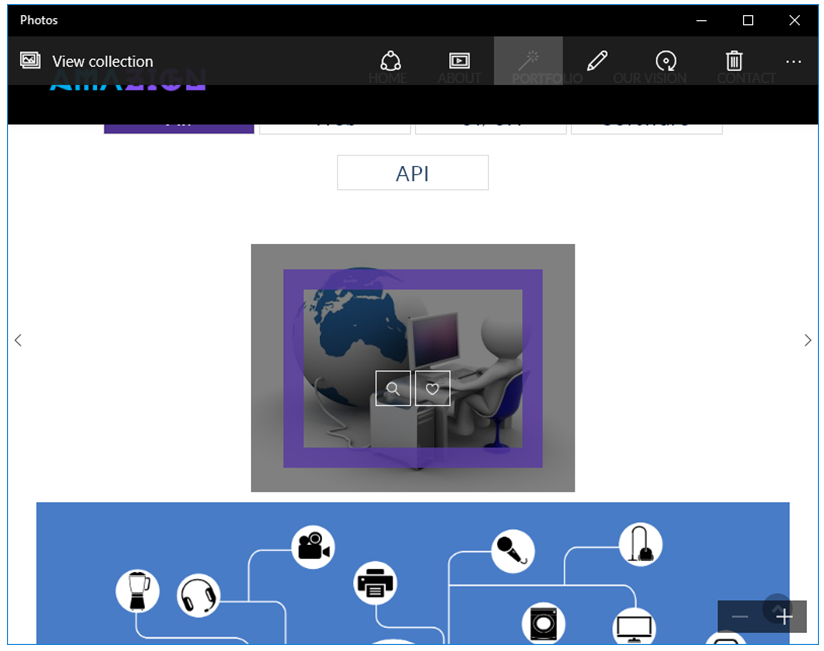
await page.screenshot({ path: 'hover.png' }) // take a screenshot
await browser.close()
})()
NB: You can use any URL of your choice,
I this example, I used a webpage that was already downloaded to facilitate the tutorial but if it concerns a URL on the www, internet connection is required to navigate to the website/web page.
The file should be saved in your default Node.js directory.
Run the code by initiating the file at the command prompt like a regular Node.js file.
The Screenshot ( image file) is then stored in the default Node.js directory with name hover.png
Output image file:
Advertisement
Advertisement