Home »
Python
Button Function and Custom Event – PyQt
Button Function and Custom Event- PyQt: In this article, we are going to study about few of button functions and, we’ll design some custom events. This is just the basic; so maybe you don’t catch it cool but we will design cooler custom events in future articles. For now just try to understand the code, and build your basics. Here, we are experimenting with one or two button functions. But, if you want to explore more and experiment with button functions; check out this link: pyqt.sourceforge.net/Docs/PyQt4/qpushbutton.html. So, let’s begin the fun again. Don’t hesitate in clearing your doubts in the comment section.
Submitted by Atul Anand, on December 28, 2017
First of all, let’s create a master code; then, we’ll do the modifications in it. I am providing you the master code here. And, the modifications made will be put with their explanations. Let’s do some coding:
Source Code:
import sys
from PyQt4 import QtGui, QtCore

class layout(QtGui.QMainWindow):

    def __init__(self):
        super(layout, self).__init__()
        self.setGeometry(150, 80,200, 200)
        self.setWindowTitle("BUTTON FUNC!")
        self.setWindowIcon(QtGui.QIcon('pythonlogo.png'))
        self.xyz()

    def xyz(self):
        b = QtGui.QPushButton("QUIT", self)
        b.clicked.connect(QtCore.QCoreApplication.instance().quit)
        b.resize(100, 100)
        b.move(60, 50)
        self.show()

def run():
    app = QtGui.QApplication(sys.argv)
    GUI = layout()
    sys.exit(app.exec_())

run()
Output
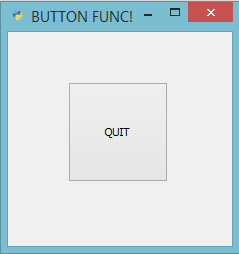
This output layout is generated using a main window widget; QtGui.QMainWindow. The self.setWindowIcon(QtGui.QIcon('pythonlogo.png')) method is used to paste a python logo as an Icon. But, first you need to download its image in the same directory of the code; otherwise you can also pass the complete path there.
QtCore.QCoreApplication.instance().quit
This method invokes a quit action for the click event generated by the push button widget. Whenever we click the push button, the interface will simply close down.
Modifications:
1. b.clicked.connect(self.close_it)
Paste this in place of b.clicked.connect(QtCore.QCoreApplication.instance().quit). This will invoke the close_it() function; a user made function for creating our custom event whenever the pushbutton is clicked. So, let’s create the close_it() function first. Be cautious while defining the close_it function under layout class.
def close_it(self):
        print(" whooooooaaaa custom's working!!! ")
        sys.exit()
Output:
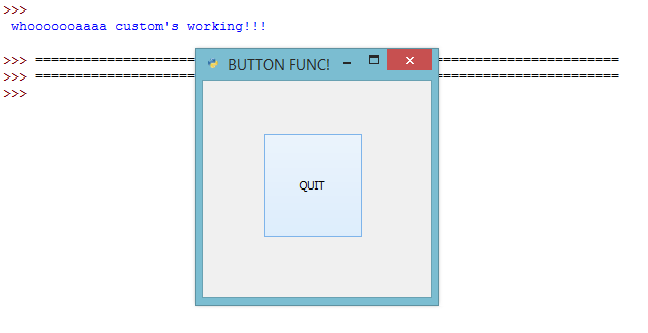
This function will print the message on the Shell window; and, the interface will close down on clicking the button.
2. self.setWindowTitle("Window-Title Changed")
Paste this function in place of sys.exit() in the close_it() function’s body. This is one of the ways we are customizing our events. Well, this is so basic; but giving you a hint that you can do a lot more with it.
Output:

You can observe the title of the GUI changed on clicking the button. Title name changed from “BUTTON FUNC!” to “Window-Title Changed”.
self.setGeometry(90, 70,300, 600)
Put this method below the above method under the same close_it() function. And, observe the change in dimensions of the main Window.
Output:

There is a change in the title name along with the change in dimensions of the window. Thus, you can perform multiple actions together through a custom event.
Here, I am just suggesting a few methods. Visit the link mentioned above in intro part to know about more inbuilt button methods. If you want to watch its video tutorial for better understanding through visuals, visit my YouTube channel- U B Vzard. Link will be very soon pasted in comment section and in upcoming articles. Now, let’s play with the style of the pushbutton through various inbuilt functions:
3. b.resize(b.sizeHint())
Paste this in place of b.resize(100, 100). Observe that we are just changing the parameters of the resize() method. The sizeHint() method suggests a default size for the PushButton according to the space left behind considering space covered by other widgets in the same window.
Output:
4
b.resize(b.minimumSizeHint())
b.move(0, 0)
The minimumSizeHint() method suggests the minimum possible size for the PushButton. Here, the size of button in the above section and here; both may look same to you; but these two don’t produce same output. You will observe the change in button size when you put other widgets with the button in the case of sizeHint(); but the button size will remain same when you use a minimumSizeHint() method.
Here, we are also changing the parameters of the button position in the move() method. This will produce the output as shown below.
The button has also shifted to the top left corner; when we are passing x = 0, and y = 0 as the parameter.
Conclusion:
This article actually aware you about the possibilities you can achieve with the custom events made by you people. You can also create your custom events for other widgets and actions too. Guys, Practice a lot. This is the only way that will make your firm command on the subject and will trigger your mind for innovative ideas for experimenting with the stuffs. Feel free to post your achievements and Queries in the comment section. Catch you later in the next article. HAPPY LEARNING!
Advertisement
Advertisement