Home »
Python
Resize an RGB image without using any inbuilt functions in Python
In this article, we will see how to resize an RGB image without using any inbuilt function in Python?
Submitted by Ankit Rai, on May 06, 2019
In the case of RGB image we have 3 planes i.e. Red, Green, Blue plane. So, for resizing RGB image we have to take each individual plane then perform resize operation on it and then merge it all.
In this program, we will be using two functions of OpenCV-python (cv2) module.let's see their syntax and descriptions first:
1) imread():
It takes an absolute path/relative path of your image file as an argument and returns its corresponding image matrix.
2) imshow():
It takes window name and image matrix as an argument in order to display an image in a display window with a specified window name.
Also In this program, we will be using one attribute of an image matrix:
shape: This is the attribute of an image matrix which return shape of an image i.e. consisting of number of rows ,columns and number of planes.
Also, here we are using the concept of array slicing
Let, A is 1-d array:
A[start:stop:step]
- start: Starting number of the sequence.
- stop: Generate numbers up to, but not including this number.
- step: Difference between each number in the sequence.
Example:
    A = [1,2,3,4,5,6,7,8,9,10]
    print(A[ 1 : : 2])

    Output:
    [2, 4, 6, 9]
Python program to resize an RGB image without using any inbuilt functions
# open-cv library is installed as cv2 in python
# import cv2 library into this program
import cv2
# import numpy library as np into this program
import numpy as np
# read an image using imread() function of cv2
# we have to pass only the path of the image
img = cv2.imread(r'C:/Users/user/Desktop/pic2.jpg')
# displaying the image using imshow() function of cv2
# In this : 1st argument is name of the frame
# 2nd argument is the image matrix
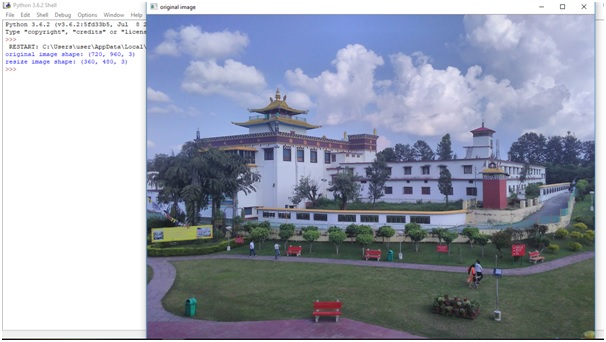
cv2.imshow('original image',img)
# print shape of the image matrix
# using shape attribute
print("original image shape:",img.shape)
# assigning number of rows, coulmns and
# planes to the respective variables
row,col,plane = img.shape
# give value by which you want to resize an image
# here we want to resize an image as one half of the original image
x, y = 2, 2
# assign Blue plane of the BGR image
# to the blue_plane variable
blue_plane = img[:,:,0]
# assign Green plane of the BGR image
# to the green_plane variable
green_plane = img[:,:,1]
# assign Red plane of the BGR image
# to the red_plane variable
red_plane = img[:,:,2]
# we take one-half pixel of rows and columns from
# each plane respectively so that, it is one-half of image matrix.
# here we take alternate row,column pixel of blue plane.
resize_blue_plane = blue_plane[1::x,1::x]
# here we take alternate row,column pixel of green plane.
resize_green_plane = green_plane[1::x,1::x]
# here we take alternate row,column pixel of red plane.
resize_red_plane = red_plane[1::x,1::x]
# here image is of class 'uint8', the range of values
# that each colour component can have is [0 - 255]
# create a zero matrix of specified order of 3-dimension
resize_img = np.zeros((row//x, col//y, plane),np.uint8)
# assigning resized blue, green and red plane of image matrix to the
# corresponding blue, green, red plane of resize_img matrix variable.
resize_img[:,:,0] = resize_blue_plane
resize_img[:,:,1] = resize_green_plane
resize_img[:,:,2] = resize_red_plane
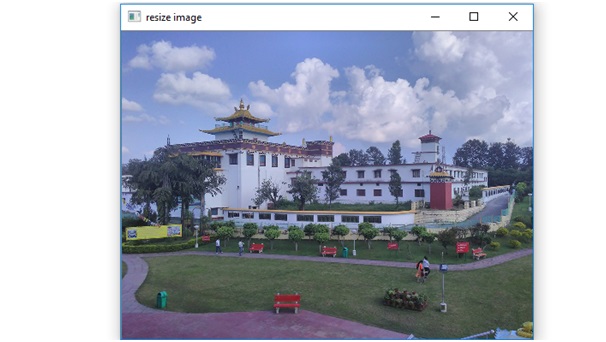
cv2.imshow('resize image',resize_img)
print("resize image shape:",resize_img.shape)
Output
Advertisement
Advertisement