Home »
Java programming language
Java AWT Introduction
Java | AWT Introduction: In this tutorial, we are going to learn how a basic GUI is designed in Java using the AWT package? This is a basic Introduction to Java AWT.
Submitted by Saranjay Kumar, on April 29, 2020
Introduction to Java AWT
Java AWT (Abstract Window Toolkit) package is a library used for designing graphical user interfaces.
It contains classes for placing various user intractable components and graphics. However, the components of this class are platform dependent. They are heavy and rely on the OS for their functioning.
The AWT package has classes using which we can create TextBoxes, CheckBoxes, RadioButton, List, etc.
Hierarchy
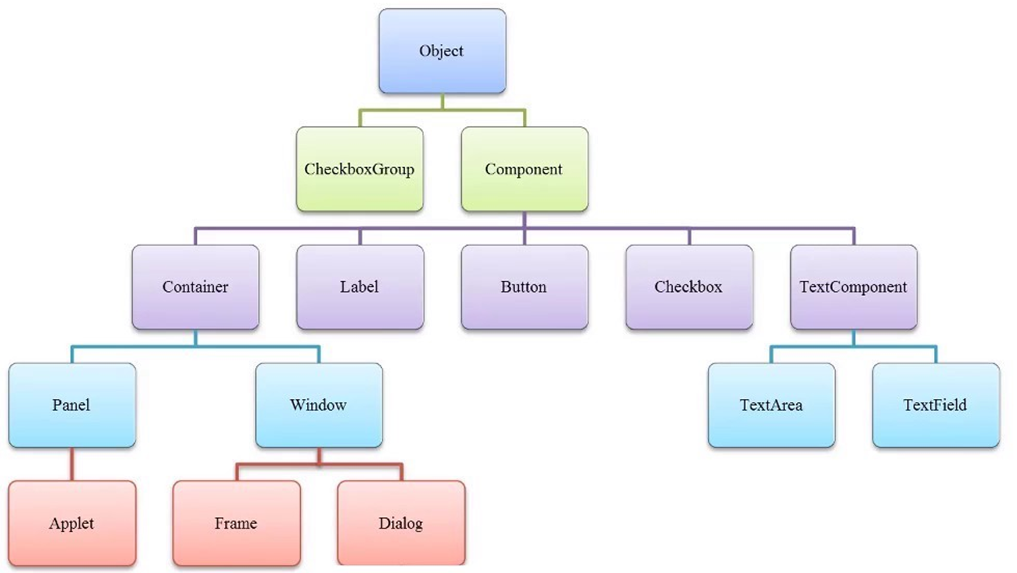
Object: All classes in Java are inherited from the object class.
Components: Elements like buttons, TextBox, RadioButton, etc. are called components in Java. We have separate classes for all components. To display elements on the screen, we need to place them in containers.
Container: It consists of classes that are used to hold other objects. All components are placed in containers, like Windows and Panels. Containers control the placement and layout of the components placed in them. A container in itself is a component.
Label: As the name suggests, it is used as a label, or a method to display text on the screen. The user cannot change the content of a label. It represents a read-only text.
Read: Java AWT Label
Button: A button is like a push button. It consists of a label (name of the button) and generates an event when clicked.
Read: Java AWT Button
Checkbox: It is used to provide options. When clicked, it changes the state of the checkbox from 'on' to 'off' or vice-versa.
Read: Java AWT Checkbox
TextField: It is used to take single-line text input from the user. It can also be used to display editable text. Unlike a label, which provides read-only text, the text in the textfield can be edited by the user.
Read: Java AWT TextField
TextArea: It allows the display of multiple lines of text. It provides 'an area' where text can be displayed and also edited by the user.
Read: Java AWT TextArea
A Simple Java AWT program
import java.awt.*;

public class HelloWorld{

     public static void main(String []args){
        Frame f = new Frame();
        Button b1 = new Button("Click me!");
        Label l1 = new Label("Label");
        TextField t1 = new TextField("Text");
        b1.setBounds(50,50,100,50);
        l1.setBounds(50,100,100,50);
        t1.setBounds(50,150,100,50);

        f.setLayout(null);
        f.setSize(300,300);
        f.setVisible(true);

        f.add(b1);
        f.add(l1);
        f.add(t1);

     }
}
Output
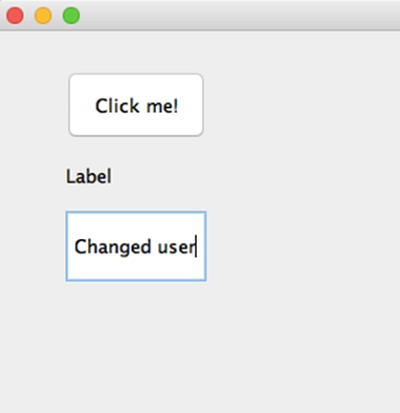
In this example, we create a button with the title "Click me", a label with un-editable text "Label" and a TextField with editable text. The text of the Textfield has been changed by the user from "Text" to "Changed user".
All these components are placed on a frame (a container), using the add() function. The position and size of these elements are decided by the setBounds() function. The size of the frame is set by the setSize() function and the frame, including all components, is made visible by the setVisible() function.
Advertisement
Advertisement