Home »
Laravel
Configuration in Laravel
Laravel configuration: In this tutorial, we are going to know about the configuration in Laravel.
Submitted by Bharti Parmar, on November 08, 2019
I hope, after reading the project structure of Laravel project, you will understand the concept of why we use the Laravel framework, it's installation and It's important directories. It's pre-defined directories made easy everything creating a project to database work.
For further process, we need to configure our project to customize it. This configuration allows you to set values.
In the config directories, we will see a bunch of various PHP files here labeled each for a section of the application. Each of these files is loaded by laravel when your application processes a request means we can add new files if we need it.
config/app.php: 'env' function with two-parameter where 'env' function gets the value from shell environment in which our application runs.
env(APP_NAME,'LARAVEL');
- First parameter, APP_NAME which is used for the environmental variable to local.
- Second parameter, LARAVEL which is the default value to use if none is set.
timezone: This value is set as a static value if we want to change this value, we could. It means we may have a different timezone for our different environments.
Laravel uses an 'env' package for these environments get set or for timezone used regardless of where our application is running.
vendor: ' .env ' file (enviornment file) : [app_name='laravel']
- [app_env = homestead]: changes and see the changes on the browser on the main laravel page.
- If you remove this 'app_env' and save then you will see the production page on the main page on the browser.
After installation, we have to do something for starting our new project or for Laravel Configuration.
1) Create a new project
Check my previous article, Installation in Laravel, if you don't know how to create a new project in laravel.
2) Database configuration on PHPMyAdmin using xampp server named "blog" (DB name). It means you have to create a database on PHPMyAdmin named "blog".
Note: you can also use your own database name.
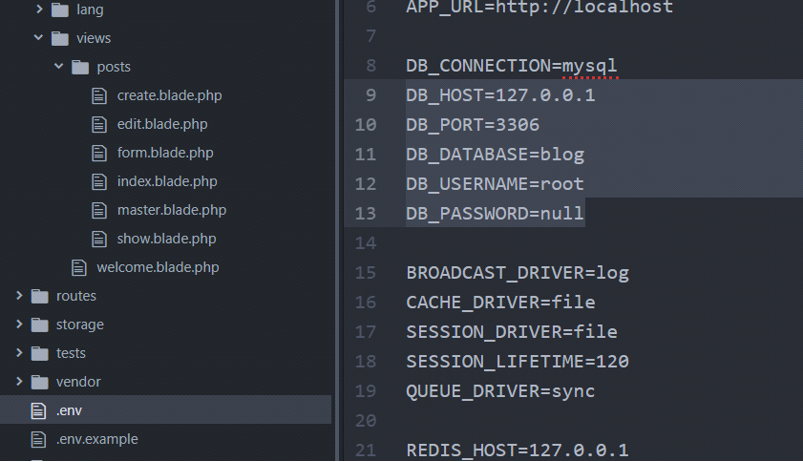
3) After this, you have to make changes in .env file which is known as environment file in Laravel.
    DB_DATABASE -> 'blog',
    DB_USERNAME -> 'root',
    DB_PASSWORD -> 'null'
4) Now, Open the project run command on Command prompt to start the laravel server for using its pre-defined functionality.
On CMD --> $ php artisan serve

5) Now, RUN on browser -> localhost:8000

Conclusion:
In this article, we are learned about the configuration of Laravel first project. I hope you will understand the concept. we will know more about it in the upcoming article. Have a nice day! Happy Learning!
Advertisement
Advertisement