Home »
Android
Linear Layout in Android with Example
Android Linear Layout: In this tutorial, we will learn about the implementation of Linear Layout with the help of an example and codes in Android.
By Manu Jemini Last updated : June 06, 2023
What is Linear Layout in Android?
Linear Layout is very widely used layout in Android layouts. In this layout, the different entities are placed in vertically or horizontally. The Two orientations are often being used together because of their cut-short manner. Linear layout arranges the objects or entities one after the other like a row or column.
How to Implement Linear Layout in Android?
This is very simple to implement if your layout is symmetrical. You just have to choose the order of the object in the layout.
The Major drawback it faces is that whenever you want to place an object in the different direction from the orientation of the parent, you will need to make another Linear-layout at that position and then set the view according to your need.
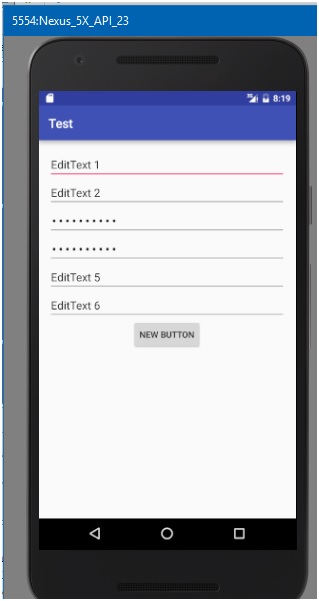
There are few situations when using Linear - the layout is beneficial as compared to other layouts. One of the most common is Registration-form. This classic approach will help your objects tight and in place. It will be very quick to place 5 or 6 EditText and a Button in horizontal and uniform manner.
Android Linear Layout Example 1
Below code is an example of using it, to get started from nothing, make an android project. An activity will automatically create for you; make use of that and alongside with it a layout file.
Java file
package numeric.test;

import android.support.v7.app.AppCompatActivity;
import android.os.Bundle;


public class MainActivity extends AppCompatActivity {
    @Override
    protected void onCreate(Bundle savedInstanceState) {
        super.onCreate(savedInstanceState);
        setContentView(R.layout.activity_main);
    }

}
Layout
<?xml version="1.0" encoding="utf-8"?>
<LinearLayout xmlns:android="http://schemas.android.com/apk/res/android"
    xmlns:tools="http://schemas.android.com/tools"
    android:layout_width="match_parent"
    android:layout_height="match_parent"
    android:paddingBottom="@dimen/activity_vertical_margin"
    android:paddingLeft="@dimen/activity_horizontal_margin"
    android:paddingRight="@dimen/activity_horizontal_margin"
    android:paddingTop="@dimen/activity_vertical_margin"
    tools:context="numeric.test.MainActivity"
    android:orientation="vertical">


    <EditText
        android:layout_width="match_parent"
        android:layout_height="wrap_content"
        android:id="@+id/editText"
        android:text="EditText 1" />

    <EditText
        android:layout_width="match_parent"
        android:layout_height="wrap_content"
        android:inputType="textPersonName"
        android:text="EditText 2"
        android:ems="10"
        android:id="@+id/editText2" />

    <EditText
        android:layout_width="match_parent"
        android:layout_height="wrap_content"
        android:inputType="textPassword"
        android:ems="10"
        android:id="@+id/editText3"
        android:layout_gravity="center_horizontal"
        android:text="EditText 3" />

    <EditText
        android:layout_width="match_parent"
        android:layout_height="wrap_content"
        android:inputType="numberPassword"
        android:ems="10"
        android:id="@+id/editText4"
        android:text="EditText 4" />

    <EditText
        android:layout_width="match_parent"
        android:layout_height="wrap_content"
        android:inputType="textEmailAddress"
        android:ems="10"
        android:id="@+id/editText5"
        android:text="EditText 5" />

    <EditText
        android:layout_width="match_parent"
        android:layout_height="wrap_content"
        android:inputType="phone"
        android:ems="10"
        android:id="@+id/editText6"
        android:layout_gravity="center_horizontal"
        android:text="EditText 6" />

    <Button
        android:layout_width="wrap_content"
        android:layout_height="wrap_content"
        android:text="New Button"
        android:id="@+id/button"
        android:layout_gravity="center_horizontal" />
</LinearLayout>
Menifest file
<?xml version="1.0" encoding="utf-8"?>
<manifest xmlns:android="http://schemas.android.com/apk/res/android"
    package="numeric.test">

    <application
        android:allowBackup="true"
        android:icon="@mipmap/ic_launcher"
        android:label="@string/app_name"
        android:supportsRtl="true"
        android:theme="@style/AppTheme">
        <activity android:name=".MainActivity">
            <intent-filter>
                <action android:name="android.intent.action.MAIN" />

                <category android:name="android.intent.category.LAUNCHER" />
            </intent-filter>
        </activity>
    </application>

</manifest>
Output

Android Linear Layout Example 2: Horizontal Orientation
Linear Layout with horizontal orientation for three buttons will look like this.
Layout
<?xml version="1.0" encoding="utf-8"?>
<LinearLayout xmlns:android="http://schemas.android.com/apk/res/android"
    xmlns:tools="http://schemas.android.com/tools"
    android:layout_width="match_parent"
    android:layout_height="match_parent"
    android:paddingBottom="@dimen/activity_vertical_margin"
    android:paddingLeft="@dimen/activity_horizontal_margin"
    android:paddingRight="@dimen/activity_horizontal_margin"
    android:paddingTop="@dimen/activity_vertical_margin"
    tools:context="numeric.test.MainActivity"
    android:orientation="horizontal">


    <Button
        android:layout_width="wrap_content"
        android:layout_height="wrap_content"
        android:text="New Button"
        android:id="@+id/button2" />

    <Button
        android:layout_width="wrap_content"
        android:layout_height="wrap_content"
        android:text="New Button"
        android:id="@+id/button"
        android:layout_gravity="center_horizontal" />

    <Button
        android:layout_width="wrap_content"
        android:layout_height="wrap_content"
        android:text="New Button"
        android:id="@+id/button3" />
</LinearLayout>
Output

Advertisement
Advertisement