Home »
Android
Android Dialogs with Examples
Android Dialogs: In this tutorial, we will learn about the dialog boxes/ alert dialogs in Android, and how to implement them. Learn with the help of examples.
By Manu Jemini Last updated : June 06, 2023
Android Dialog Box
A dialog is a very easy way to show any texts, form, listview etc. The dialog provides very simple techniques to set it. For this tutorial to work, just create a new project with any name. You will get a default activity namely MainActivity, you can make use of it.
Starting with your XML file, drag, and drop Button, from the widget section. There is no implication about the parent layout type. Make your layout the way you want it. The button is taken because it will give us to show it on SetOnClickListener().
The second thing is your JAVA file. To begin with, you should import Button class from the widget, this is done by adding this line import android.widget.Button; After that, in your activity, there would a default onCreate() function, this would be pre-set to use quickly.
Now, you would need to have a variable of type Button and set it with the reference of the Button in the layout file.
- Button B;
- B=(Button)findViewById(R.id.button);
This Button then, set to listen for the click event and if so, produce an alert dialog with the message.
After doing everything up, your code should look like this. Connect an Android device or run an ADV and then build your project to see the result.
Android Dialogs Example 1: Simple Dialog Box
Java file
package com.example.hp.demo;

import android.content.Context;
import android.content.DialogInterface;
import android.support.v7.app.AlertDialog;
import android.support.v7.app.AppCompatActivity;
import android.os.Bundle;
import android.view.View;
import android.widget.Button;
import android.widget.EditText;


public class MainActivity extends AppCompatActivity
{
    AlertDialog.Builder ad=null;
    Button B;
    Context ctx=this;
    @Override
    protected void onCreate(Bundle savedInstanceState)
    {
        super.onCreate(savedInstanceState);

        setContentView(R.layout.activity_main);
        B=(Button)findViewById(R.id.button);

        B.setOnClickListener(new View.OnClickListener() {
            @Override
            public void onClick(View v) {
                ad=new AlertDialog.Builder(ctx);
                ad.setTitle("Include help");
                ad.setIcon(R.drawable.icon);
                ad.show();
            }
        });
    }

}
XML file
<?xml version="1.0" encoding="utf-8"?>
<RelativeLayout xmlns:android="http://schemas.android.com/apk/res/android"
    android:orientation="vertical" android:layout_width="match_parent"
    android:layout_height="match_parent"
    android:weightSum="1">


    <Button
        android:layout_width="wrap_content"
        android:layout_height="wrap_content"
        android:id="@+id/button"
        android:layout_alignParentTop="true"
        android:layout_alignParentEnd="true"
        android:layout_marginTop="250dp"
        android:hint="Click here to see dialog box"
        android:layout_marginRight="90dp" />
</RelativeLayout>
Manifest file
<?xml version="1.0" encoding="utf-8"?>
<manifest xmlns:android="http://schemas.android.com/apk/res/android"
    package="com.example.hp.demo">

    <application
        android:allowBackup="true"
        android:icon="@mipmap/ic_launcher"
        android:label="@string/app_name"
        android:supportsRtl="true"
        android:theme="@style/AppTheme">
        <activity android:name=".MainActivity">
            <intent-filter>
                <action android:name="android.intent.action.MAIN" />

                <category android:name="android.intent.category.LAUNCHER" />
            </intent-filter>
        </activity>
    </application>

</manifest>
Output

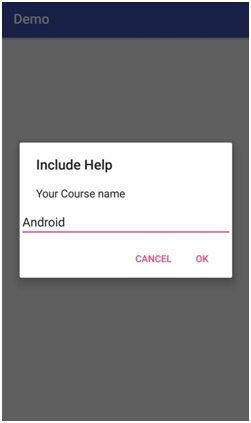
Android Dialogs Example 2: Dialog Box with User Input
Java file
import android.support.v7.app.AppCompatActivity;
import android.os.Bundle;
import android.view.View;
import android.widget.Button;
import android.widget.EditText;


public class MainActivity extends AppCompatActivity
{
    AlertDialog.Builder ad=null;
    Button B;
    Context ctx=this;
    @Override
    protected void onCreate(Bundle savedInstanceState)
    {
        super.onCreate(savedInstanceState);

        setContentView(R.layout.activity_main);
        B=(Button)findViewById(R.id.button);

        B.setOnClickListener(new View.OnClickListener() {
            @Override
            public void onClick(View v) {
                ad=new AlertDialog.Builder(ctx);
                ad.setTitle("Include Help");
                ad.setMessage("Your Course name");
                EditText E=new EditText(ctx);
                ad.setView(E);
                ad.setNegativeButton("Cancel",new Cancel_Click());
                ad.setPositiveButton("OK",new Ok_Click());
                ad.show();
            }
        });
    }
class Cancel_Click implements DialogInterface.OnClickListener{

        @Override
        public void onClick(DialogInterface dialog, int which) {

        }
    }
class Ok_Click implements DialogInterface.OnClickListener{

    @Override
    public void onClick(DialogInterface dialog, int which) {

    }

}

}
XML file
<?xml version="1.0" encoding="utf-8"?>
<RelativeLayout xmlns:android="http://schemas.android.com/apk/res/android"
    android:orientation="vertical" android:layout_width="match_parent"
    android:layout_height="match_parent"
    android:weightSum="1">


    <Button
        android:layout_width="wrap_content"
        android:layout_height="wrap_content"
        android:id="@+id/button"
        android:layout_alignParentTop="true"
        android:layout_alignParentEnd="true"
        android:layout_marginTop="250dp"
        android:hint="Click here to see dialog box"
        android:layout_marginRight="90dp" />
</RelativeLayout>
Manifest file
<?xml version="1.0" encoding="utf-8"?>
<manifest xmlns:android="http://schemas.android.com/apk/res/android"
    package="com.example.hp.demo">

    <application
        android:allowBackup="true"
        android:icon="@mipmap/ic_launcher"
        android:label="@string/app_name"
        android:supportsRtl="true"
        android:theme="@style/AppTheme">
        <activity android:name=".MainActivity">
            <intent-filter>
                <action android:name="android.intent.action.MAIN" />

                <category android:name="android.intent.category.LAUNCHER" />
            </intent-filter>
        </activity>
    </application>

</manifest>
Output

Advertisement
Advertisement