Home »
Android
Tabbed Activity in Android with Example
Android | Tabbed Activity: In this article, we will learn about the Tabbed Activity with the help of examples, and how to use fragment under tabbed activity in Android.
By Manu Jemini Last updated : June 08, 2023
In the android studio, we have been given a variety of different activities to make use of any one of them is Tabbed activity. This activity can easily be included in your android studio project.
How to Create/Add Tabbed Activity in Android?
To add the activity Open your android studio. Now when your project is opened that will look similar to the below picture.
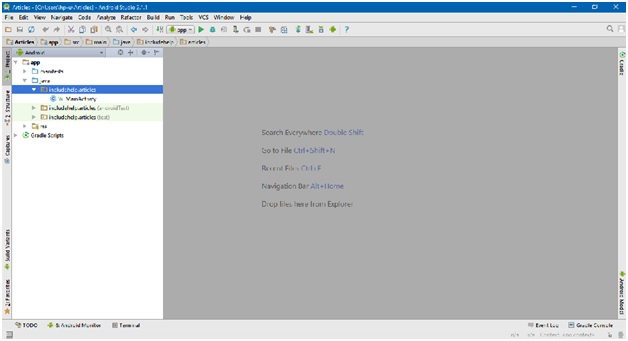
Your android project have a java and resource directory, java directory contains all of your JAVA files and rec dicrectory conatins all of your resources and layout files, which anyway like a resource.
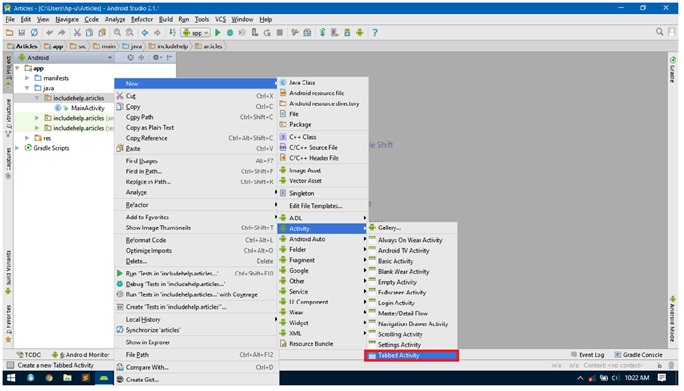
To make a new activity, right click on Java folder and choose new → activity → Tabbed Activity. This is been illustrated below. After choosing the mentioned activity, Android Studio will ask to you about the name and other confriguations.
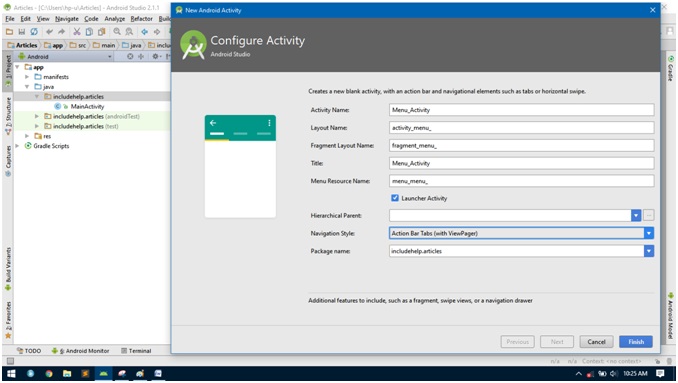
The Next step is to give information about the activity. First you should give the name of your activity, then layout name followed by fragment layout name, Title name.
The Important option is the check-box of launcher activity. If you want to make this the activity which should come at the beginning of the app, you have to check that check-box, else the studio will leave it as a separate activity.
You can also mention the parent of this activity if it has any. It comes down to the Navigation style. You should choose the style which you prefer. The Studio will take care of the package name.
That’s all, press FINISH.
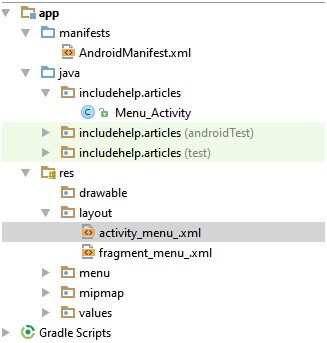
You will have three new files, one java and two resource file. All three are set for the work to do. The Java activity will have the business code and fragment file will have the menu and the last layout file will have Viewpagers to set different fragment when user swipes or uses the menu.
You can change the Number of tabs in the java file and can also give each one a title.
@Override
public int getCount() {
    // Show 3 total pages.
    return 3;
}

@Override
public CharSequence getPageTitle(int position) {
    switch (position) {
        case 0:
            return "SECTION 1";
        case 1:
            return "SECTION 2";
        case 2:
            return "SECTION 3";
    }
    return null;
}
You will find this block of code in your JAVA file’s last section. Change the return statement of getCount() function and modify the switch() in the getPageTitle() function.
For example like this,
@Override
public int getCount() {
    // Show 5 total pages.
    return 3;
}

@Override
public CharSequence getPageTitle(int position) {
    switch (position) {
        case 0:
            return "SECTION 1";
        case 1:
            return "SECTION 2";
        case 2:
            return "SECTION 3";
	case 3:
            return "SECTION 4";
        case 4:
            return "SECTION 5";
    }
    return null;
}
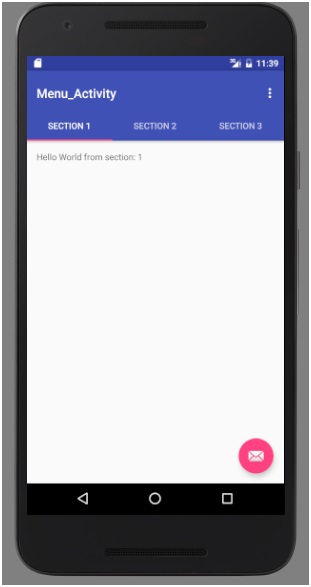
Output
How to Use Fragment Under Tabbed Activity?
A Fragment is like a component which has a JAVA File and a Layout file just like an Activity. Creating a fragment is rather simple, the concept is very simple. It does not have anything very different than activity.
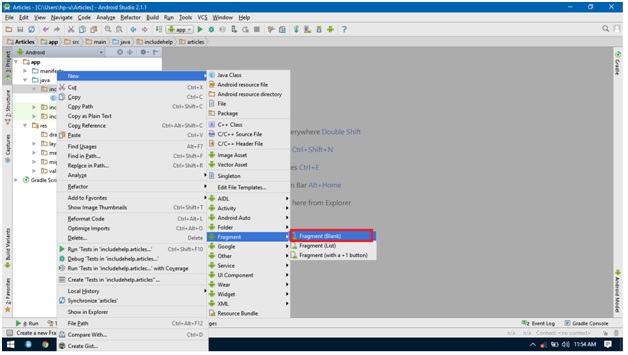
To create a fragment right-click on JAVA folder and select → new → fragment → blank fragment.
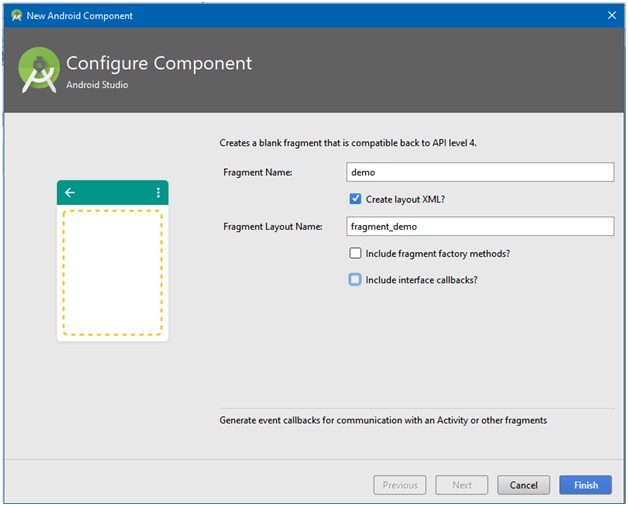
Now like activities you have to specify Fragment Name, also take care that you must check on create layout XML check-box, this will make you give a Fragment Layout Name. Also uncheck the Include fragment factory methods and include interface callbacks.
After this press FINISH.
You will have two files a JAVA and a XML.
JAVA File will look like this,
package includehelp.articles;


import android.os.Bundle;
import android.support.v4.app.Fragment;
import android.view.LayoutInflater;
import android.view.View;
import android.view.ViewGroup;


public class demo extends Fragment {

    @Override
    public View onCreateView(LayoutInflater inflater, ViewGroup container,
                             Bundle savedInstanceState) {
        return inflater.inflate(R.layout.fragment_demo, container, false);
    }

}
Layout File:
<FrameLayout xmlns:android="http://schemas.android.com/apk/res/android"
    xmlns:tools="http://schemas.android.com/tools"
    android:layout_width="match_parent"
    android:layout_height="match_parent"
    tools:context="includehelp.articles.demo">

    <!-- TODO: Update blank fragment layout -->
    <TextView
        android:layout_width="match_parent"
        android:layout_height="match_parent"
        android:text="Fragment Text" />

</FrameLayout>
Now you must add this Fragment in your Tabbed Activity. You can make anything of this fragment just like an activity.
The last section of JAVA FILE of menu activity should be like this,
public class SectionsPagerAdapter extends FragmentPagerAdapter {

    public SectionsPagerAdapter(FragmentManager fm) {
        super(fm);
    }

    @Override
    public Fragment getItem(int position) {
        if(position == 0){
            return  new Demo();
        }else{
            return PlaceholderFragment.newInstance(position + 1);
        }

    }

    @Override
    public int getCount() {
        // Show 3 total pages.
        return 3;
    }

    @Override
    public CharSequence getPageTitle(int position) {
        switch (position) {
            case 0:
                return "Fragment";
            case 1:
                return "SECTION 2";
            case 2:
                return "SECTION 3";
        }
        return null;
    }
}
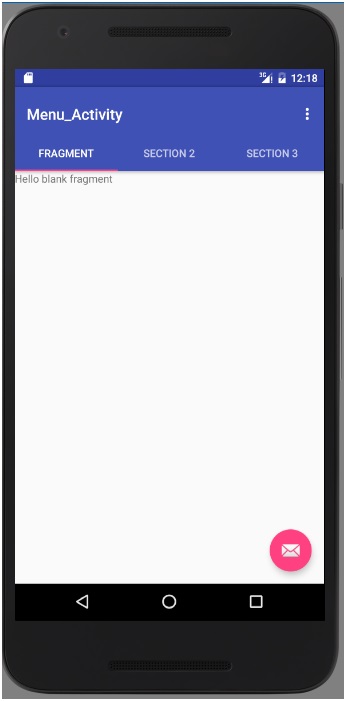
In here we have edited the functions and will got the desired result.
Menifest File:
<?xml version="1.0" encoding="utf-8"?>
<manifest xmlns:android="http://schemas.android.com/apk/res/android"
    package="includehelp.articles">

    <application
        android:allowBackup="true"
        android:icon="@mipmap/ic_launcher"
        android:label="@string/app_name"
        android:supportsRtl="true"
        android:theme="@style/AppTheme">
        <activity
            android:name=".Menu_Activity"
            android:label="@string/title_activity_menu_"
            android:theme="@style/AppTheme.NoActionBar">
            <intent-filter>
                <action android:name="android.intent.action.MAIN" />

                <category android:name="android.intent.category.LAUNCHER" />
            </intent-filter>
        </activity>
    </application>

</manifest>
Output:
Advertisement
Advertisement