Home »
Android
How to fill a ListView with Class Objects in Android?
Fill a ListView with Class Objects: In this tutorial, we will learn how to make a ListView and fill it with class objects in Android.
By Manu Jemini Last updated : June 08, 2023
The List is a very common thing to use in android as it is used to show multiple data of similar kind. The Data will be stored in an array of a class. This class will have objects which have the properties to hold certain values within them. These values will be a single list item. So below is the code for the Model or the list item.
Android ListView Example with Class Objects
Java file
package includehelp.articles;
public class Contacts {

    private String name;
    private String mobile;
    private String phone;
    public  Contacts(  String name,String mobile,String phone)
    {
        this.name=name;
        this.mobile=mobile;
        this.phone=phone;

    }


    public String getMobile() {
        return mobile;
    }

    public void setMobile(String mobile) {
        this.mobile = mobile;
    }

    public String getName() {
        return name;
    }

    public void setName(String name) {
        this.name = name;
    }

    public String getPhone() {
        return phone;
    }

    public void setPhone(String phone) {
        this.phone = phone;
    }
}
The Above class is used to get and set values. We have used these functions in the custom adapter. The Custom Adapter is a java class which takes the array of data. This class then iterates through the items and makes a single small view for this item and adds it to the big list view.
package includehelp.articles;

import android.content.Context;
import android.view.LayoutInflater;
import android.view.View;
import android.view.ViewGroup;
import android.widget.ArrayAdapter;
import android.widget.ImageView;
import android.widget.TextView;

import java.util.List;


public class CustomAdapter extends ArrayAdapter<Contacts> {
    Context c;
    public CustomAdapter(Context context, int resource, List<Contacts> objects) {
        super(context, resource, objects);
        c=context;
    }

    @Override
    public View getView(int position, View convertView, ViewGroup parent) {

        LayoutInflater li = (LayoutInflater) c.getSystemService(c.LAYOUT_INFLATER_SERVICE);
        convertView = li.inflate(R.layout.contact_layout, parent, false);
        Contacts cl=getItem(position);
        TextView name=(TextView)convertView.findViewById(R.id.name);
        TextView mobile=(TextView)convertView.findViewById(R.id.mobile);
        TextView phone=(TextView)convertView.findViewById(R.id.phone);

        name.setText(cl.getName());
       mobile.setText(cl.getMobile());
        phone.setText(cl.getPhone());

        return convertView;

    }
}
Now, the main business logic remains is main_activity class.
Main Activity
package includehelp.articles;

import android.support.v7.app.AppCompatActivity;
import android.os.Bundle;
import android.widget.ListView;

import java.util.ArrayList;
import java.util.List;

public class MainActivity extends AppCompatActivity {
    ListView L;
    List<Contacts> list=new ArrayList<Contacts>();
    @Override
    protected void onCreate(Bundle savedInstanceState) {
        super.onCreate(savedInstanceState);
        setContentView(R.layout.activity_main);
        L=(ListView)findViewById(R.id.listView);
        Contacts c1 = new Contacts("ABC","123","456");
        Contacts c2 = new Contacts("XYZ","798","026");
        Contacts c3 = new Contacts("PQR","498","561");
        list.add(c1);
        list.add(c2);
        list.add(c3);
        CustomAdapter adp=new CustomAdapter(this,R.layout.activity_main,list);
        L.setAdapter(adp);
    }
}
This Main_Activity will hold the list_view and Adapter together.
<?xml version="1.0" encoding="utf-8"?>
<RelativeLayout xmlns:android="http://schemas.android.com/apk/res/android"
    xmlns:tools="http://schemas.android.com/tools"
    android:layout_width="match_parent"
    android:layout_height="match_parent"
    android:paddingBottom="@dimen/activity_vertical_margin"
    android:paddingLeft="@dimen/activity_horizontal_margin"
    android:paddingRight="@dimen/activity_horizontal_margin"
    android:paddingTop="@dimen/activity_vertical_margin"
    tools:context="includehelp.articles.MainActivity">

    <ListView
        android:layout_width="wrap_content"
        android:layout_height="wrap_content"
        android:id="@+id/listView"
        android:layout_centerHorizontal="true" />
</RelativeLayout>
Above is the big List_View and below is the small List_item view.
<?xml version="1.0" encoding="utf-8"?>
<LinearLayout xmlns:android="http://schemas.android.com/apk/res/android"
    android:orientation="vertical" android:layout_width="match_parent"
    android:layout_height="match_parent"
    android:weightSum="1">

    <TextView
        android:layout_width="fill_parent"
        android:layout_height="wrap_content"
        android:text="Name"
        android:id="@+id/name"
        android:layout_gravity="center_horizontal"
        android:layout_weight="0.08" />

    <TextView
        android:layout_width="fill_parent"
        android:layout_height="wrap_content"
        android:text="Mobile"
        android:id="@+id/mobile"
        android:layout_gravity="center_horizontal"
        android:layout_weight="0.10" />

    <TextView
        android:layout_width="fill_parent"
        android:layout_height="wrap_content"
        android:text="Phone"
        android:id="@+id/phone"
        android:layout_gravity="center_horizontal"
        android:layout_weight="0.15" />
</LinearLayout>
And to specify the launcher activity between all this is menifest.
<?xml version="1.0" encoding="utf-8"?>
<manifest xmlns:android="http://schemas.android.com/apk/res/android"
    package="includehelp.articles">

    <application
        android:allowBackup="true"
        android:icon="@mipmap/ic_launcher"
        android:label="@string/app_name"
        android:supportsRtl="true"
        android:theme="@style/AppTheme">
        <activity android:name=".MainActivity">
            <intent-filter>
                <action android:name="android.intent.action.MAIN" />

                <category android:name="android.intent.category.LAUNCHER" />
            </intent-filter>
        </activity>
    </application>

</manifest>
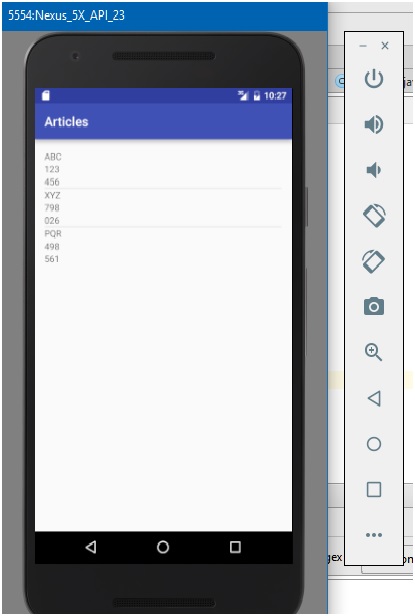
Output
Advertisement
Advertisement