Home »
Python
Show different planes of an RGB image in Python
In this article we will see how to show different planes i.e. red, green, blue planes of the RGB image?
Submitted by Ankit Rai, on April 30, 2019
A colored image can be represented as a 3 order matrix. The first order is for the rows, the second order is for the columns and the third order is for specifying the color of the corresponding pixel. Here, we use the BGR color format(because OpenCV python library works on BGR format, not on RGB), so the third order will take 3 values of Blue, Green, and Red respectively.
Colour planes of BGR image:
Consider a BGR image array I then,
- I[:, :, 0] represents the Blue colour plane of the BGR image
- I[:, :, 1] represents the Green colour plane of the BGR image
- I[:, :, 2] represents the Red colour plane of the BGR image
In this program, we will be using two functions of OpenCV-python (cv2) module. let's see their syntax and descriptions first :
1) imread():
It takes an absolute path/relative path of your image file as an argument and returns its corresponding image matrix.
2) imshow():
It takes window name and image matrix as an argument in order to display an image in a display window with a specified window name.
3) shape: This is the attribute of an image matrix which return shape of an image i.e. consisting of number of rows ,columns and number of planes.
Python program to display different planes of an RGB image
# open-cv library is installed as cv2 in python
# import cv2 library into this program
import cv2
# import numpy library as np
import numpy as np
# read an image using imread() function of cv2
# we have to pass only the path of the image
img = cv2.imread(r'C:/Users/user/Desktop/pic4.jpg')
# displaying the image using imshow() function of cv2
# In this : 1st argument is name of the frame
# 2nd argument is the image matrix
cv2.imshow('original image',img)
# shape attribute of an image matrix gives the dimensions
row,col,plane = img.shape
# here image is of class 'uint8', the range of values
# that each colour component can have is [0 - 255]
# create a zero matrix of order same as
# original image matrix order of same dimension
temp = np.zeros((row,col,plane),np.uint8)
# store blue plane contents or data of image matrix
# to the corresponding plane(blue) of temp matrix
temp[:,:,0] = img[:,:,0]
# displaying the Blue plane image
cv2.imshow('Blue plane image',temp)
# again take a zero matrix of image matrix shape
temp = np.zeros((row,col,plane),np.uint8)
# store green plane contents or data of image matrix
# to the corresponding plane(green) of temp matrix
temp[:,:,1] = img[:,:,1]
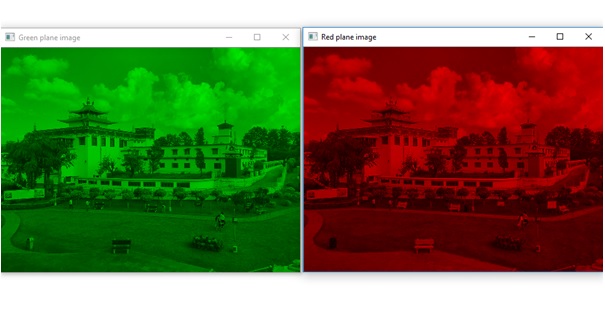
# displaying the Green plane image
cv2.imshow('Green plane image',temp)
# again take a zero matrix of image matrix shape
temp = np.zeros((row,col,plane),np.uint8)
# store red plane contents or data of image matrix
# to the corresponding plane(red) of temp matrix
temp[:,:,2] = img[:,:,2]
# displaying the Red plane image
cv2.imshow('Red plane image',temp)
Output

Advertisement
Advertisement