Home »
jQuery »
jQuery Examples
jQuery: Change class name
In this tutorial, we'll discuss how to change the CSS class name using jQuery?
Submitted by Pratishtha Saxena, on July 22, 2022
There are a few methods for changing the CSS class name using jQuery. Let's start by adding a new class name to an already existing element.
1) Change class name using jQuery addClass() Method
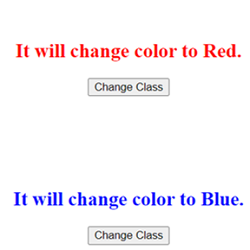
Adding new class name is done by using addClass() method in jQuery. It adds a specified class to the selected element. You can select multiple elements at the same time and add multiple classes to it.
Syntax:
$(selector_1, selector_2,...).addClass("class_1 class_2 class_3");
By using this we can add as many classes we wish to add to the selected elements.
Example 1:
HTML:
<!DOCTYPE html>
<html lang="en">
   <head>
      <meta charset="UTF-8">
      <title>Title</title>
      <script src="https://ajax.googleapis.com/ajax/libs/jquery/3.6.0/jquery.min.js"></script>
   </head>
   <body>
      <center>
         <h2 id="one">It will change color to Red.</h2>
         <button id="button_1">Change Class</button>
         <br><br><br><br><br><br>
         <h2 id="two">It will change color to Blue.</h2>
         <button id="button_2">Change Class</button>
      </center>
   </body>
</html>
CSS:
<style>
    .red {
      color: red;
      font-weight: bold;
    }

    .blue {
      color: blue;
      font-weight: bold;
    }
</style>
jQuery Function:
<script>
    $(document).ready(function(){
      $("#button_1").click(function(){
        $("#one").addClass("red");
      });

      $("#button_2").click(function(){
        $("#two").addClass("blue");
      });
    });
</script>
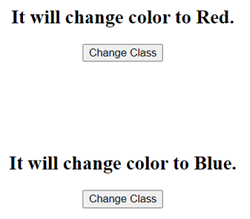
Output:
Before:
After:
2) Change class name using jQuery removeClass() Method
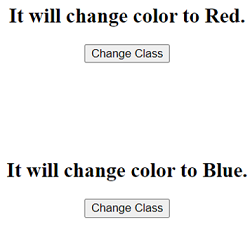
The class can also be removed by using the removeClass() method in jQuery. It removes the specified class from the selected elements. The way we add classes, we can also remove classes from the elements.
Syntax:
$(selector_1, selector_2,...).removeClass("class_1 class_2 class_3");
Example 2:
HTML:
<!DOCTYPE html>
<html lang="en">
   <head>
      <meta charset="UTF-8">
      <title>Title</title>
      <script src="https://ajax.googleapis.com/ajax/libs/jquery/3.6.0/jquery.min.js"></script>
   </head>
   <body>
      <center>
         <h2 id="one" class="red">It will change color to Red.</h2>
         <button id="button_1">Change Class</button>
         <br><br><br><br><br><br>
         <h2 id="two" class="blue">It will change color to Blue.</h2>
         <button id="button_2">Change Class</button>
      </center>
   </body>
</html>
CSS:
<style>
    .red {
      color: red;
      font-weight: bold;
    }

    .blue {
      color: blue;
      font-weight: bold;
    }
</style>
jQuery:
<script>
    $(document).ready(function(){
      $("#button_1").click(function(){
        $("#one").removeClass("red");
      });

      $("#button_2").click(function(){
        $("#two").removeClass("blue");
      });
    });
</script>
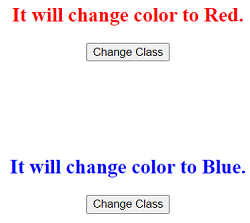
Output:
Before:
After:
Advertisement
Advertisement