Home »
Embedded Systems
Create Counter Using an 8-bits LCD | AVR
In this tutorial, we will learn how to create a counter using an 8-bits LCD using AVR Microcontroller using Embedded C language code.
By Suryaveer Singh Last updated : May 12, 2023
This type of counter may be also used in the EVM machines. A counter can be used to count the number of times a button is pressed. It can have many applications. The most widely used counter application is in EVM and also in customer feedback machines.
Code to Create Counter Using an 8-bits LCD | AVR
#include <avr/io.h>
#define F_CPU 1000000
#include <util/delay.h>
#define RS 0
#define EN 1

void lcd_comm	(char);
void lcd_data	(char);
void lcd_init	(void);
void lcd_string	(char*);
void lcd_num	(int n);


int main(void)
{
	int c = 0;
	DDRA = 0x00;

	lcd_init();
	lcd_comm(0x84);
	lcd_string("COUNTER");

	lcd_comm(0xC5);
	lcd_data(c+48);

	while(1)
	{
		if( (PINA & 0x01) == 1 )
		{
			c++;
			lcd_comm(0xC5);
			lcd_num(c);
			while( (PINA & 0x01) == 1 );
		}
	}
}

void lcd_comm(char x){
	PORTD = x;
	PORTC &= ~(1<<RS);

	PORTC |= 1<<EN;

	_delay_ms(5);
	PORTC &= ~(1<<EN);
}

void lcd_data(char x){
	PORTD = x;
	PORTC |= 1<<RS;

	PORTC |= 1<<EN;

	_delay_ms(5);
	PORTC &= ~(1<<EN);
}

void lcd_init(void){
	DDRD = 0xFF;
	DDRC = 0x03;

	lcd_comm(0x38);
	lcd_comm(0x06);
	lcd_comm(0x0E);
	lcd_comm(0x01);
	lcd_comm(0x80);
}

void lcd_string(char* p){
	while(*p!='\0'){
		lcd_data(*p);
		p++;
	}
}

void lcd_num(int n){
	lcd_data((n/1000)+48);
	n %= 1000;

	lcd_data((n/100)+48);
	n %= 100;

	lcd_data((n/10)+48);
	n %= 10;

	lcd_data(n+48);
}
Explanation
- Firstly we have included all the header file that is required basically
- At the initial condition, we have defined EN=1 and RS=0.
- Next we have defined certain functions lcd_comm(char), lcd_data(char) and lcd_init(void) etc.
- Inside the int main(void) we have created a variable c which is an integer and initially it is equal to zero. It will remember the number of times we will press our push button.
-
DDRA=0x00 says that we have connected a push button to PA0.
The lcd_init(); will run the lcd_init function that we have defined below.
The command 0x84 is made our string(COUNTER) in between of the LCD display
Lcd_string("COUNTER") will print COUNTER.
Lcd_data(c+48) is used to write our string in ASCII code.
- Inside the while loop, we have written our condition if the button is pressed we add 1 to our variable c.
- The command 0xCS will overwrite the initial zero condition of our counter.
- Inside the void lcd_comm(char x), we have taken the variable as char x, which we have assigned to PORTD. In the next step we have masked the initial value of RS which was initially 0, and here we have made it 1. Next, we have made our Enable Pin high and then low by giving the time delay of 5ms in between.
-
Again for the next function, we would be giving the data to LCD through this. We have taken a variable x, and assigned to PORTD, again made RS pin 0 and also have done similarly the Enable pin high and then low by providing the time delay of 5ms. In this function lcd_init(void), we have written all the commands that are required for the LCD at the beginning. The DDRD=0xFF indicates all the data pins connected to the PORTD, and DDRC=0x03 is for the connection of the ENABLE Pin and R/S pin we connected to PORTC.
0x38 - as the LCD is in 8 bit mode.
0x06 - cursor shifts to the right.
0x0E - display ON and cursor ON.
0x01 - clears the screen.
Ox80 – 0th row and 0th column.
- The function lcd_string(char *p) is used to print the words and are simple strings, here we have used them to print the word COUNTER.
- The void lcd_num(int n) function is used to display n which is equal to the number of times the button is pressed. Inside the function, we have defined three conditions for n to be a three digit number, a two digit number, and a single digit number. We have also used mod here so that we can get the accurate value of n.
Simulation
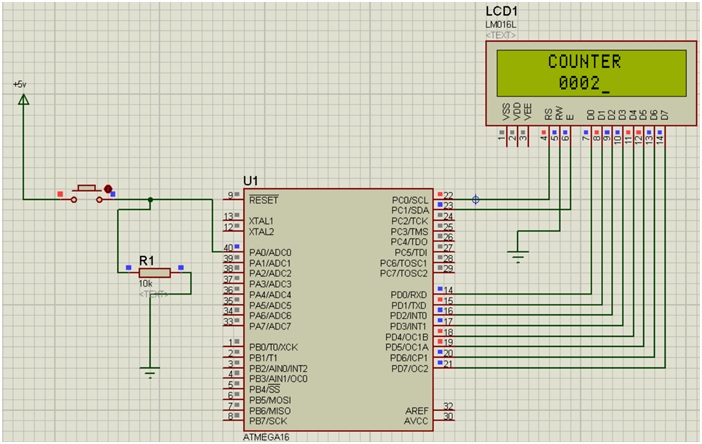
Simulation Explanation
-
Components required:
- 1 resistor
- 2 ground terminal
- LM016L i.e. our LCD
- Atmega16
- Push button
- Power terminal
- Make the connections as shown above.
- Double click on power terminal and edit its property to +5V.
- Connected the resistor after the push button such that the high unwanted current goes directly ti it.
- Double click the Atmega16 and debug the HEX file.
- Click on the Run Button and your counter will run and the no. if times you will press the button will appear on the screen.
Advertisement
Advertisement