Home »
Embedded Systems
AVR | Seven Segments LCD Display
In this tutorial, we will learn what seven segments are and after that we will create a short program to display numbers in seven segments.
By Suryaveer Singh Last updated : May 12, 2023
AVR | Seven Segments LCD Display
Here, I will give you a brief knowledge about seven segments, about what a Seven Segment is and how we will use it to display numbers.
So, a Seven Segment is a display device used to display decimal numerals. It is most commonly used in display clocks, electronic meter etc. It has a total of seven segments which we can use to display Arabic Numerals.
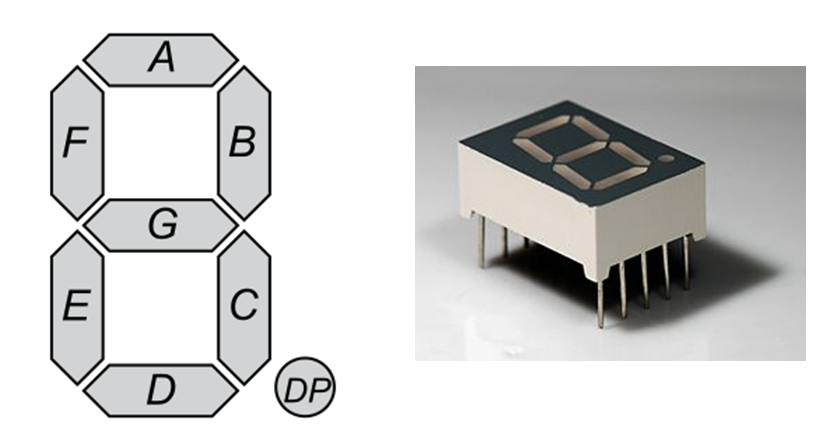
Image source: 7 Segment Display (Wiki)
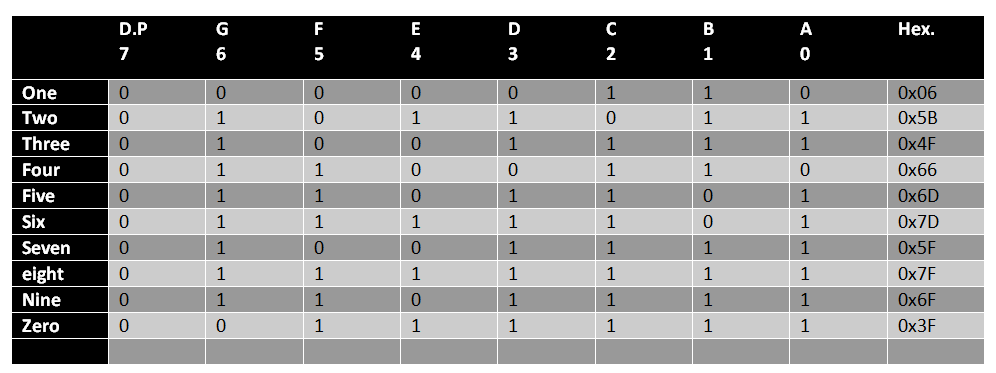
Here A, B, C, D, E, F, G, H are the segments that we would use to display a number. Here DP stands for Dot Pin.
The segment which we want to glow is given by input 1.
This was all the little thing that you should know about a 7-segmentNowwe will create a simple program using two seven segments to display numbers till 99.
C Program to Print Numbers on Seven Segments LCD Display
#include<avr/io.h>
#defineF_CPU1000000
#include<util/delay.h>

int main(void)
{
	int i,j;

	DDRC=0xFF;
	DDRD=0xFF;
	charseg[]={0x3F,0x06,0x5B,0x4F,0x66,0x6D,0x07,0x7F,0x6F};

	while(1)
	{
		for(i=0;i<=9;i++)
		{
			for(j=0;j<=9;j++)
			{
				PORTD=seg[j];
				PORTC=seg[i];
				_delay_ms(400);
			}
		}
	}

	return 0;
}
Explanation
- Here, we have taken two variable i,j which are integers. We have taken it because we have to run the loop for the numbers that will appear on the 7-segment.
- Here, DDRC=0xFF represent the terminals in which our first 7-segment is connected and DDRD=0xFF represents the terminals in which our second, 7-segment is connected.
- Inside the char seg[], it shows the hexadecimal codes of all the number from zero to nine (more explained in the table above).
- Inside the while loop, we have written two for conditions such that when the segment connected to PORTD completes its loop of showing numbers till 9, then the segment connected to PORTC shows 1 for the first loop then 2 for the second loop and so on.
- Basic C is required here to understand these nested for loop.
- Both, the variables are used for their respective seven segments.
- A delay of 400 ms is provided to ensure proper visibility of numbers changing.
Simulation
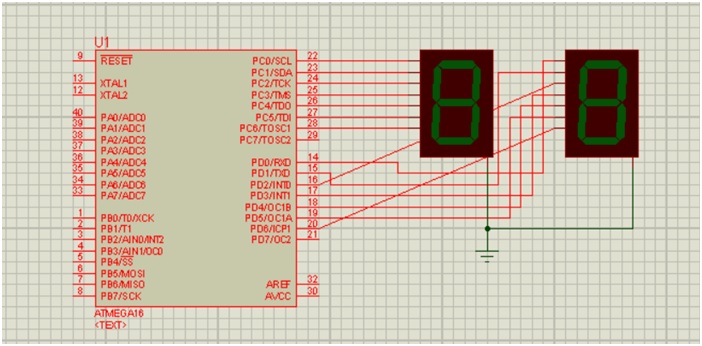
Simulation Explanation
-
Devices Required:
- ATmega16
- One ground Terminal
- Two 7SEG-COM-CAT-GRN of any colour that you want
- Connect the devices as shown above.
- Connect the first 7seg to the PORTC and another 7seg to PORTD as shown.
- Connect the ground terminal as shown.
- Double click on the Atmega16 and place the HEX file through the program that you created above.
- Click on the play button and your simulation will start and both the segments will run like a timer runs.
Advertisement
Advertisement