Home »
AutoCAD
AutoCAD 2022 – Rectangle Command
Learn about the Rectangle Command in AutoCAD 2022, how to use it?
By Akash Periyasamy Last updated : April 01, 2023
What is Rectangle Command?
Rectangle command in AutoCAD is used to produce rectangles of the required dimension within the design workspace. The rectangle is a geometry with four sides out of which the two parallel sides have the same dimension. For creating simpler objects, the rectangle command is used as it reduces the time consumed to create a rectangle by using the line command.
How to Enable Rectangle Command?
Rectangle command can be enabled using two methods namely:
-
First Method:
In this method, the command is enabled by clicking on the icon shown below which is present in the ribbon panel.

- Second Method:
It is an alternative method in which the command is enabled by typing REC in the command line.
The rectangle command can create a simple rectangle as well as rectangles with added-on features. Let us explore each type available with an example for better understanding.
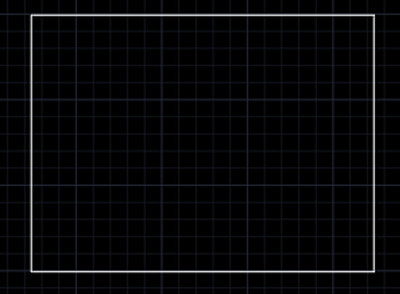
1) Rectangle with specified dimension
In this type, the rectangle with a dimension of length 1000 mm and width 750 mm is created.
- Type REC to enable Rectangle command.
- Specify the first point of the rectangle randomly within the design workspace.
- Now, you will be prompted to specify the second point for the rectangle.
- Enter 1000 mm as length and 750 mm as width in the tab provided to add on the dimension for the rectangle.
- Thus, the required rectangle is produced.
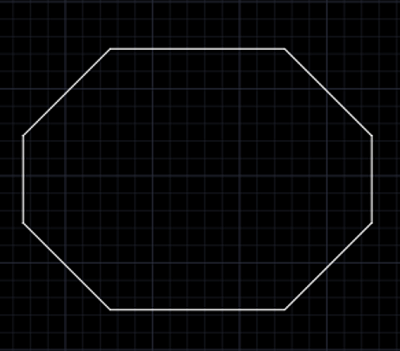
2) Rectangle with Chamfer
Chamfering is the process of producing a beveled edge to avoid damage to the sharp corners of the object. In this type, the rectangle with a dimension of length 1000 mm and width 750 mm along with a chamfer length of 250 mm inclined at 45 degrees is created.
- Type REC to enable Rectangle command.
- Type C to select the Chamfer Option.
- Enter the first chamfer and second chamfer value as 250 mm to get the required chamfer.
- Then, specify the first point of the rectangle randomly within the design workspace.
- Now, you will be prompted to specify the second point for the rectangle.
- Enter 1000 mm as length and 750 mm as width in the tab provided to add on the dimension for the rectangle.
- Thus, the required rectangle is produced.
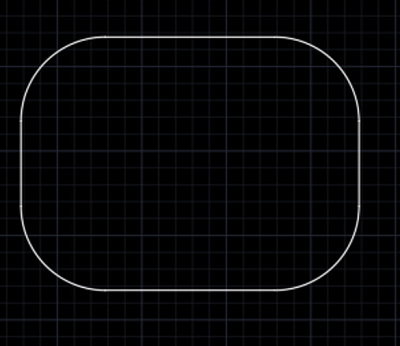
3) Rectangle with Fillet
Fillet is the curved edge produced at the sharp corners to prevent damage to the corner of the object as well as to prevent human injury. In this type, the rectangle with a dimension of length 1000 mm and width 750 mm along with a fillet radius of 250 mm is created.
- Type REC to enable Rectangle command.
- Type F to select the Fillet Option.
- Enter the radius value of the fillet as 250 mm to get the required fillet.
- Then, specify the first point of the rectangle randomly within the design workspace.
- Now, you will be prompted to specify the second point for the rectangle.
- Enter 1000 mm as length and 750 mm as width in the tab provided to add on the dimension for the rectangle.
- Thus, the required rectangle is produced.
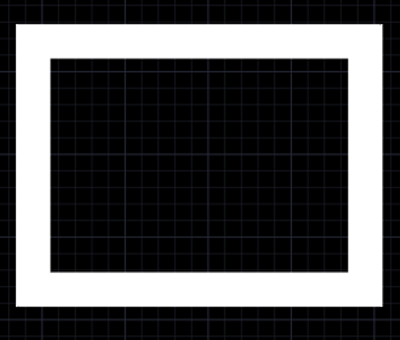
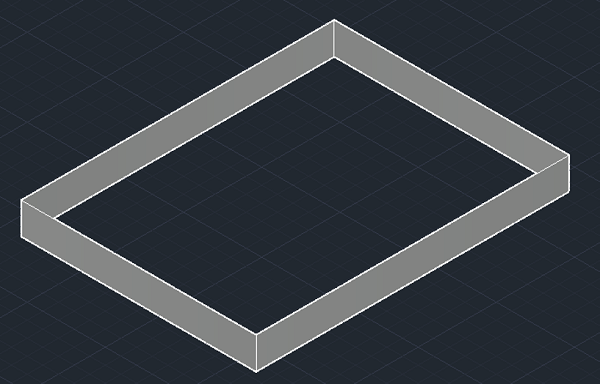
4) Rectangle with Width
The peripheral thickness of the rectangle can be increased with the aid of this option. In this type, the rectangle with a dimension of length 1000 mm and width 750 mm along with a width of 100 mm is created.
- Type REC to enable Rectangle command.
- Type W to select the Width Option.
- Enter the width of the rectangle as 100 mm.
- Then, specify the first point of the rectangle randomly within the design workspace.
- Now, you will be prompted to specify the second point for the rectangle.
- Enter 1000 mm as length and 750 mm as width in the tab provided to add on the dimension for the rectangle.
- Thus, the required rectangle is produced.
5) Rectangle with Thickness
Thickness is the three-dimensional value that is added to the rectangle to make it a solid rather than a surface. In this type, the rectangle with a dimension of length 1000 mm and width 750 mm along with a thickness value of 100 mm is created.
- Type REC to enable Rectangle command.
- Type T to select the Thickness Option.
- Enter the thickness value as 100 mm to get the required geometry.
- Then, specify the first point of the rectangle randomly within the design workspace.
- Now, you will be prompted to specify the second point for the rectangle.
- Enter 1000 mm as length and 750 mm as width in the tab provided to add on the dimension for the rectangle.
- Thus, the required rectangle is produced.
- To view the rectangle, we need to change the design workspace to 3D modelling.
Advertisement
Advertisement