Home »
JavaScript
Forms in JavaScript (form validations)
JavaScript Forms: In this tutorial, we are going to learn forms in HTML using JavaScript, along with the input friend validations.
Submitted by Siddhant Verma, on October 08, 2019
JavaScript Forms
One of the key tasks of a frontend developer is to carry out form validations for certain types of fields in a form. You must have noticed when you're setting up a password for your account on a website, you're allowed to enter only certain characters. That password field is an input field that is a part of the form that comprises other fields such as username, email, etc. In general, almost every website needs a form since users sign up and login is nothing but an HTML form that takes values from the user.
On filling the form, you press sign up or log in which performs certain other operations like taking you to your account or prompting an error if there was a login error. Your form on the web reacts to events that are triggered on clicking the submit button or pressing enter if the field is in focus. Hence forms are quite important to understand. Since they're never static, we dynamically interact with the user using the form field to carry out the next sequence of tasks. In this article, we'll look at how to build a basic form and how to react to events of the form?
Creating a simple HTML form with some basic styles
Let's get started by creating a simple HTML form with some basic styles...
<html lang="en">

<head>
    <meta charset="UTF-8">
    <meta name="viewport" content="width=device-width, initial-scale=1.0">
    <meta http-equiv="X-UA-Compatible" content="ie=edge">
    <title>Forms</title>
</head>
<style>
    form {
        margin: 20px auto;
        padding: 20px 20px;
        text-align: center;
        width: 400px;
        height: 400px;
        background: rgba(85, 84, 165, 0.356);
    }

    h2 {
        font-family: 'Gill Sans', 'Gill Sans MT', Calibri, 'Trebuchet MS', sans-serif;
        font-size: 40px;
        color: white;
    }

    input {
        background: white;
        border: 2px solid gainsboro;
        height: 30px;
        padding: 10px auto;
        margin: 10px auto;
    }

    input::placeholder {
        color: rgba(86, 90, 141, 0.61);
        text-transform: uppercase;
        letter-spacing: 3px;
        text-align: center;
    }

    input[type=submit] {
        border: 2px solid gainsboro;
        border-radius: 8px;
        cursor: pointer;
        background-color: rgb(97, 176, 179);
        color: whitesmoke;
        padding: 5px 5px;
        margin: 10px;
        text-transform: uppercase;
        box-shadow: 2px 2px 2px rgb(15, 52, 83);
    }
</style>

<body>
    <form action="">
        <h2>Form</h2>
        <input type="text" placeholder="name" id="name">
        <input type="submit" value="submit">
    </form>

</body>
Okay so now we have a very basic form ready which looks something like this.

Okay so let's imagine you have this form on your website and you need to send the information about the name user enters your backend which validates this name in their database and sends a response. Imagine this like a very basic version of the login form. We have a simple name field and every user in our database has a unique name and on clicking submit we need to check if the name user-entered exists in our database or not for login. Thus we need to capture the value entered in the input field and bind that to an event listener to our submit button.
An easy way to do this is to use the click event on the submit button. However, click events only react to clicks and a versatile form reacts to pressing enter when the field is in focus. Hence we will use a submit event for this purpose.
So first let's capture the submit button and add a submit event to it...
<script>
    const form = document.querySelect('form');
    form.addEventListener('submit', e => {})
</script>
The default behavior of the submit event is to reload the page. Try clicking the submit button you'll see your page reloading. We don't need that, so let's remove it. We have the event object available to us and we can tell our form using that event object to prevent the default behavior of our submit event.
e.preventDefault();
Alright, now let's capture the value of our input field. We have a traditional way of doing this in which we first add a query selector and then use the value property.
const name=document.querySelector('#name')
console.log(name.value);
We can also directly use the form variable to get the value of the input field by referencing the id assigned to that field.
console.log(form.name.value);
In the case of multiple input fields in a form, this method comes in very handy as it saves time and code where we attach every input field to a variable to reference it.
< script >
    const form = document.querySelector('form');
    //const name=document.querySelector('#name');

form.addEventListener('submit', e => {
    e.preventDefault();
    //console.log(name.value);
    console.log(form.name.value);
})
< /script>
That's how you listen to form events and capture the input field values.
We can do all sorts of things by triggering the submit event.
HTML provides us with some basic validations that we can add in our form. Let's try to implement these. First, let's restructure our form and add some more input fields.
<form action="">
    <h2>Form</h2>
    <input type="text" placeholder="name" id="name">
    <br>
    <input type="text" placeholder="email" id="email">
    <br>
    <input type="text" placeholder="password" id="password">
    <br>
    <input type="text" placeholder="userid" id="name">
    <br>
    <input type="text" placeholder="date of joining" id="dateofjoining">
    <br>
    <input type="submit" value="submit">
</form>
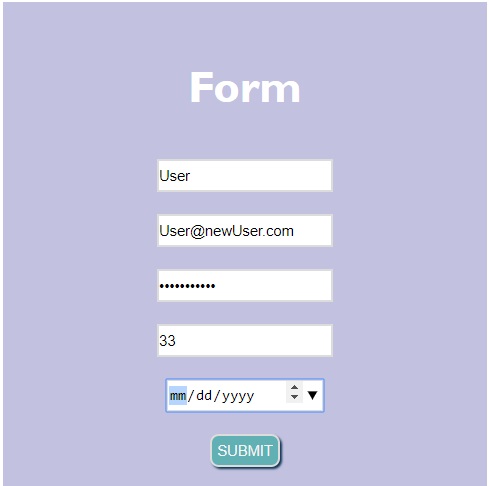
We have an email, password, and date of joining fields as well. The type property of the input field is an in build validator for the outfield. Currently, all fields have a type of text which states that these fields can be populated by any text which could basically include any and every character. Logically, we must not let the user enter any letters in the userid field, the date of joining should be made a date picker for proper formatting and data uniformity. Similarly, we should prevent showing the password to the user as she types for security reasons. We can do these by simply setting the corresponding types to the fields depending on the values we want the user to enter.
<form action="">
    <h2>Form</h2>
    <input type="text" placeholder="name" id="name">
    <br>
    <input type="text" placeholder="email" id="email">
    <br>
    <input type="password" placeholder="password" id="password">
    <br>
    <input type="number" placeholder="userid" id="name">
    <br>
    <input type="date" placeholder="date of joining" id="dateofjoining">
    <br>
    <input type="submit" value="submit">
</form>
We have used the type number for userID, added a date picker to the date of joining and the type password hides the text that the user enters. Thus we have added some checks to our fields which makes our form a little better than before.
If you want to learn how to validate forms, read the article on Regular Expressions in JavaScript where we build a more intensive form and validate their fields using regular expressions.
JavaScript Tutorial »
Advertisement
Advertisement